Chapter 17A

I like this map A LOT. So much so in fact that I've already gushed about it on my blog. Here is the link for your enjoyment:
https://thecrusadergrant.blogspot.com/2016/09/analyzing-thracia-776-chapter-17a.html
I'm going to try and approach this from a different angle this time. The more I thought about it, the more I realized that this map in particular was kind of like 10B / 11A in Binding Blade.
Both maps are the kind that give the player A LOT to do and put said player in a position where if they want to get all the goodies then they need to play really fast. It was a close call between both versions, but what gives Thracia the edge in this case is that it's less frustrating to play. As someone noted when we talked about 10B / 11A, there are suicidal NPC's that can be frustrating to deal with. I agree with this assessment, but I still love those maps regardless. 17A has all the benefits of 10B & 11A without the drawback.
It also has an additional turtle disincentives that can put a lot of pressure on the player:
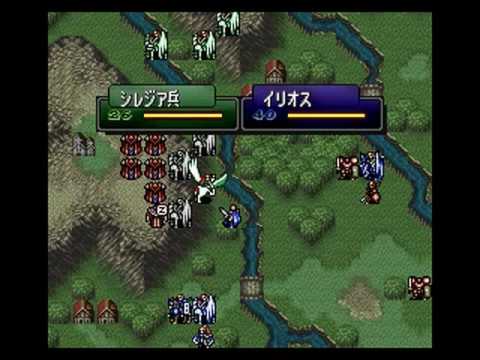
- First, Cyas appears. Cyas's presence alone boosts enemy hit rates and avoid by 30 %, meaning that he can make ordinary enemy mooks significantly more challenging to deal with. Cyas has the Sleep staff at his disposal, which will make your life even more difficult.
- In addition to Cyas appearing, there will be a three-tile bridge that will form, allowing that army of Armor Knights to cross. And don't forget, this army will be boosted by Cyas's leadership stars.
- Then another boss appears with an army of Mage Knights. They show up right where the player used to be. They too, will have their stats boosted by Cyas's leadership stars.
Fortunately Cyas will leave after a few turns, but by that point the player has to deal with the map putting them between a rock and a hard place. Overall, this map is amazing and it continues to stay that way.
______________________________________________________
Chapter 21x

You know, I'm not a fan of how most gaiden chapters are designed. They can be a bit gimmicky, they generally tend to be short and there's a good chance that there will be Fog of War on those maps. Chapter 21x has none of that nonsense. More importantly, it's a capture paradise! There's a lot of Warp staves and Thoron to steal on this level and trying to get them all is what makes this map so much fun. The treasures at the middle of the map are also good too since you get a Knight Proof, Bolting and Unlock staff.
This map also does a great job of putting pressure on the player in the form of enemy reinforcements. What this map does that's so interesting is that it sprinkles enemy reinforcements all throughout the map. And it does so consistently enough so that it can build up over time. It won't punish you at first, which can lull the player into a false sense of security. But if the player does not heed the game's warning, they will suffer the consequences.
In order to unlock this map, at least one of the player's characters has to be captured. It is admittedly weird and counter-intuitive to purposefully let one of your units get captured, but for me it's forgiven by the fact that it makes for an interesting side objective. It gives the player one more reason to push forward. So what this map ultimately gives the player is the potential to capture and steal some really sweet items, get their captured allies back and unlock some goodies all while the game puts pressure on said player. This map gets my vote for "Best Designed Gaiden Chapter In The Series."
____________________________________________________
# 2: Thracia 776: Chapters 9 & 13

Chapters 9 & 13 are on here for essentially the same reason: They're extremely fun Escape maps. Their set-up is the same which is why I like them equally. In both maps the player is set on the opposite side of the map and is asked to reach a spot on the map that is being attacked by enemy units. It's a great set-up in both a gameplay sense and in a story sense.
These maps have houses you can visit that add a little extra spice to the chapter. They act as detours for the player and can slow said player down, but in both chapters the treasures contained are worth it. In chapter 9 you get the Fala Scroll at the village that's on top, and Stamina bags for the village down below. The Fala Scroll gives a + 5 % growth to Strength and Magic in addition to a + 10 % growth to Skill and Speed. It also protects the player from non-Wrath critical hits, which is especially helpful in this chapter since the Wyvern Knights at the bottom of the map, including the boss, all have Killer Lances.
The Stamina bags on the bottom are a HUGE boon. It's rare for this game to outright sell Stamina bags so whenever this game hands an opportunity like that on a silver platter you take it. Stamina bags let the player use their units as much as they want without having to sit out the next chapter. They're fun to use, but they only show up every now and then. These bags are at the bottom of the map, which means that they have a catch to them. You'll have to cut down Armor Knights, a bishop and potentially suffer the wrath of Wyvern Knights equipped with Killer Lances. Plus while you're dealing with that, the enemy army marches on. Tick-Tock. Tick-Tock.

In Chapter 13 the villages basically give you armor slaying weapons to help you deal with the legion of Armor Knights and a Knight Proof. Again, the design choice is ultimately the same: Place treasures in areas that force the player to go out of the way to reach them, but still make it worth the players' time. As a result there's a cost-benefit analysis that the player has to make when approaching this level.
Another interesting design element is that both maps have their escape points defended by playable units. There are playable characters, and in Chapter 13 playable non-portrait mooks. This gives the player an extra element of choice. While you're trying to play catch-up you also have to defend those spots. The defenders aren't very strong so there's actual tension.
Last, but not least, these are Escape chapters; which means that if the player wants to beat the map and still have every unit available in the next chapters, they'll have to make sure that everyone escapes. This puts an extra emphasis on the player to choose their units carefully. And considering the fact that both chapters only allow a relative handful of units to be used the suggestion here is to pick wisely.
On a last minute note, it's fun to warp a promoted Asvel to a forest tile on Chapter 13 and see him wreck face. It's even better when you kill the boss, because after he dies the majority of the Grandbell army retreats like total wusses. Even breaking Thracia 776 is a heap of fun.
No comments:
Post a Comment