Sunday, January 22, 2023

Quick First Impressions of Fire Emblem Engage (Up to Chapter 8)


So I wanted to do a quick write-up of my thoughts on Fire Emblem Engage so far. I got the game yesterday afternoon, and have been playing on Hard / Classic. I just beat Chapter 8, and wanted to leave my initial first impressions on the game.

I'll get the story and characters out of the way, since I don't have much to say about them. My thoughts on the story echo what everyone else is saying. The storytelling is shallow and vapid, the characters are bland, and Lumera's death scene isn't very good. In fact, you could make an argument that it's worse than Mikoto's death scene in Fates. I also really dislike how much pandering to Alear there is. If someone were to take a shot every time the words "Divine One" was used, you'd die of alcohol poisoning by Chapter 3 or 4. 

Now that this is out of the way, let's focus on the gameplay, shall we?


Positives

+ The Break Mechanic: I love the Break mechanic! It makes the weapon triangle more important and relevant. It also makes the game more Player Phase oriented. It's hard to juggernaut / tank through the game when your unit can be robbed of counterattacking. It also encourages the player to have a more diverse team that covers all the different weapon types so that they can take advantage of the mechanic. 

I also love how it doesn't apply to Armor Knights! It makes Armor Knights more useful (Louis is the first character in my party to get promoted, and I just reclassed Amber to an Armor Knight), and it makes fighting them more difficult. Most Armor Knights in this game are so durable that you have to change up your tactics and either use anti-armor weapons or use magic. This gives me Berwick Saga vibes, when armored enemies were so tanky that you had to use magic and Hammers to deal with them. Any game that can remind me of how glorious Berwick Saga was is definitely doing something right.


+ The Emblems Are Balanced! : When I first heard about Sigurd and Celica's Emblems, I immediately feared that they would break the game in half. I am pleasantly surprised that they don't. This game is obviously balanced around the use of emblems, and the game expects you to use them to your advantage. The fact that you can only use them for 3 turns is another positive that this game has going for it.


+ The Difficulty: I am playing on Hard / Classic, and am pleasantly surprised that I've had to reset quite a bit on some chapters. I can't speak for Maddening, but Hard / Classic is both challenging and fair. I've never felt like the game screwed me over with b.s. Every reset was because my strategy was lacking. Speaking of a lack of bs, NO AMBUSH SPAWNS! It is good to see that this game rightfully steered of that awful mechanic. 

+ Chain Stuff: Having certain enemies be "Backup" fighters that perform chain strikes, and having healers use Chain Guard is a pretty ingenious idea. It waters down the Pair Up mechanic from Awakening and Fates, and relegates it to special niches with certain characters. It can reward smart positioning without being super broken or dominating the game.


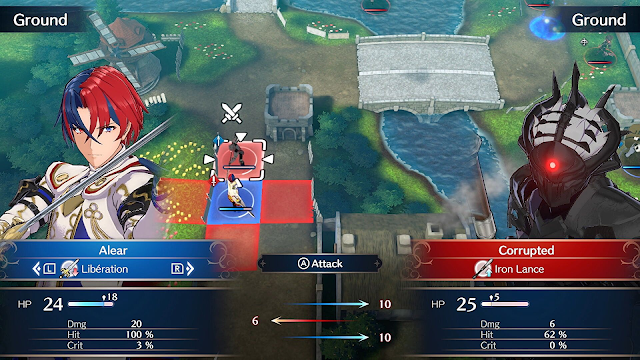
+ Skills: This game seems to have the best implementation of personal skills out of all the games that use them. I find myself actively making decisions based on them, and they seem to reward smart positioning. Stuff like Alear getting Camilla's personal skill, Framme and Clanne's personal skills providing boosts to Alear's stats, Celine's personal skill boosting recovery items, etc. It's also helpful that Engage will show you just what skills are in effect, which helps to remind the player that they're there, and that they're making an impact on the gameplay. 

+ Weapons and Forging: While I'm still a fan of weapon durability, I don't find myself missing it too much here. My first impression is that the weapons are balanced. I could be wrong on this, and it will later turn out that there was the "One True Weapon to Break Them All", but so far there doesn't seem to be any massive imbalance in weaponry. No weapon feels too strong, or feels too weak. Again, this could be subject to change but the game is off to a good start on this point.

I still haven't managed to wrap my head around how forging works, but it also comes off as more balanced than previous titles. I'm curious what everyone else thinks. Is there something about forging that I'm missing, or is the mechanic more balanced here than in previous titles?

Negatives

+ Underwhelming Map Design: So far, I haven't been impressed by the map design in this game. I can't think of a map that I've hated, but I also can't think of any maps that I love either. Chapter 5 gets my vote for being the best designed map that I've played so far. The thief getting the treasure was actually difficult to get to, and I had to smartly use Vander with Sigurd's Override to get to him in time. The enemy reinforcements make choke pointing a bad idea, which means that the map itself works incredibly well with the Break mechanic.  

Chapter 4 is also pretty good. Your army is split up into two teams, and has to work together to get to the enemy boss, the enemy reinforcements are well positioned and succeed at putting pressure on the player, and the enemy composition is pretty good too. Overall, it's a pretty good map. 

The Chapter where you get Anna is also pretty good. Again, you have to split your army up, and the thieves gunning for the treasure help to put some pressure on the player. 


The main flaw of may of these maps is that they don't have enough turtle disincentives. You can generally play slowly and methodically progress through some of the enemies just fine. I'll also add that the first three maps of the game are obvious tutorial maps, which get progressively more boring when replaying the game, and weren't even that good on a first playthrough.

I wish the map had more objectives than just "Kill Boss" with a sprinkling of Rout maps. 

+ Boss Resurrection Stone: This game brought back the Three Houses mechanic where you have to kill certain bosses more than once. It makes boss fights more tedious (though to be fair, it does make them slightly more challenging) and drags out the pacing of the fight.

__________________________________________________

Final Thoughts: Not a fan of the story or the characters, but the gameplay gets more right than wrong. I'm happy to see the gameplay succeed on multiple levels. I'm hoping that the map quality improves, and that we get more objectives than either "Kill Boss" or "Rout". 

I like the gameplay. I'm not super hyped / over the moon about it, but I like it. It's way too early for me to declare it "The Best Gameplay Since (Insert FE Title Here)" but I can say that the gameplay is a positive that the game has going for it. 


Keep in mind, that I could totally change my mind about this as I get further in. Who knows what the later chapters will bring?

Saturday, January 14, 2023

Fire Emblem Final Map Ranking Part 3

And now we've gotten to the part where the final maps are bad. Because of how many of them there are, I'm going to try to summarize the issues that make them so bad:

  • Making the final chapter a simple boss rush against a final boss that's comically weak: Idounn, Fomortiis, Ashnard, FE 3 Medeus, Garon, and Grima are all weak final bosses that can be defeated rather easily. The accompanying maps is basically just "get your unit to this weak boss and kill them" except getting to said boss usually doesn't take that much work or effort to get there. Fire Emblem 3 Book 2 doesn't even have enemies present during the Player Phase (except for Medeus).

  • Fire Emblem 12's final map isn't a joke on the higher difficulties, but it can feel like a slog fighting through really powerful enemies if you don't employ some kind of Rescue shenanigan strategies. Medeus is definitely not a joke in 12, but it feels like you have to proc a critical hit or two, because otherwise he'll take a while to kill. All the same, it's a bad idea. 

  •  Shadow Dragon is a whole two tiers below FE 1 due to the fact that higher difficulties require suicide-revival strategies revolving around Tiki. Yeah, Marth isn't even a major factor in fighting Medeus despite the fact that the entire game builds up to him doing exactly that! Plus, when people bring up Shadow Dragon's final map on the highest difficulty, ambush spawn ballista always seem to make it into the conversation. That's a recipe for disaster and fury right there.


The Bullshit Final Maps


  • Conquest 

 Conquest Fans: "Conquest has a tough, but fair difficulty."

Also Conquest Fans: "Conquest Lunatic Endgame is bullshit!"

It's strange how Conquest is lauded as being a "fair" difficulty, and yet many of the fans of this game will also say that Conquest Lunatic Endgame is bullshit without seeing the contradiction. Out of curiosity, has anyone beaten the final map of Conquest Lunatic without rescue cheesing or using a Vantage Sorcerer build? I'm curious to see if that's possible, because as of now those are the only two strategies I can think of that actually work toward beating this map.

And that's the main problem: Conquest Lunatic Endgame makes normal play either impossible, or close to it. Like Birthright and Revelation, you can't save on this map so if you restart, you have to replay the previous map which is a monumentally dumb decision. Quite a few enemies have Inevitable End combined with the Enfeeble staff, Staff Savant, and Hidden Weapons so your characters get debuffed into oblivion. By Turn 5 the enemies on the map will have you locked down in a pincer formation, which further makes the map extremely unfun to deal with. A well designed endgame map shouldn't require strategies this specific to beat it. 


In Summation: These maps suck mostly because the final bosses are poorly designed, and these levels rely way too much on fighting said final boss. As mentioned before, the best designed final chapters are the ones that focus less on the final boss, and more on how to get to said final boss.

Fire Emblem Final Map Ranking Part 2


 Next on the list are the final maps that are okay: Holy War, Gaiden, Echoes, & The Verdant Wind route of Three Houses.

Holy War


What makes Holy War's final chapter stand out is that it's basically designed like an ordinary map of Holy War. Normally this would be a negative, given Holy War's controversial map design, but here it actually makes it better than the many maps in the "These Suck" tier. Each castle has its own army, and tries to do something differently. In Edda, you have a wall of status staves and ballistic siege tomes, Dozel throws a two-pronged attack of axe knights, Friege throws armored magic users, a mini boss like Hilda, and tries to attack you from behind with a bunch of bow knights.

Then you have to deal with some surprisingly powerful Pegasus Knights with Runeswords and Awareness, and then you kill Manfroy to free Julia so that she can get the awesomely powerful Book of Naga to kill Julius with. You also have to deal with Arion, who will try to capture your castle from behind, which is pretty fun.

It's a much more involved map than many of the ones on this list, which is why it's given a mid tier rank. However, it still plays like a normal Holy War map, for better or for worse. I appreciate the fact that you can't skip it, and that the focus is more on getting closer to the final boss, rather than on fighting the final boss themselves. It could be better, but it could also be so much worse. 


Gaiden / Echoes


Another example of a game with bad map design having an okay final chapter. Both maps have a lot of empty space between the player units and the enemies they need to kill, which is a typical element of Gaiden / Echoes map design. Once again, the enemies here are more or less the kind of enemies the player has had to deal with on their way here. The swamp section between them both can help bog down the pace of the chapter, since it will reduce the movement of most of your troops.  


Verdant Wind's Final Map


Despite what the tier list might suggest, Verdant Wind's final map actually goes in the mid tier, rather than the "bullshit" tier. Tier list maker didn't have an icon for all of the routes in Three Houses and since most of them suck, Verdant Wind was treated as the oddball. This map is a boss rush to get to Nemesis, but at the very least the player is required to kill the 10 Elites before they can get to Nemesis. That being said, it does lose a lot of points for being a simple swamp with enemies strewn about in a haphazard way. At least it's better than the final map of all the other routes.

Fire Emblem Final Map Ranking


A while back, someone asked me to rank all the final maps in Fire Emblem. That was roughly a year or more ago. Time flies, and I still hadn't gotten around to it. I apologize for taking so long, but here we go. Before ranking the final maps, I'd like to add a caveat that my memory of some of these games is a bit fuzzy. It's been forever since I've played the following games:

  • Fire Emblem 1
  • Shadow Dragon
  • Birthright
  • Revelations
  • Awakening
  • The Three Houses final maps 

The reason why I'm bringing this up is because for these maps I had to rely on the feedback of other people. If your memory of these maps is more recent than mine, feel free to let me know if I got . Now that this is out of the way, I will provide my rationale for the rankings.


Gold Standard Tier: Berwick Saga, Thracia 776, & Fire Emblem 7

I'd like to share two quotes about this map from an ltc player who beat this map in 6 turns: "Without a doubt, this is the most difficult mission in the game, whether playing casually or LTCing. " 

"This mission requires extremely precise movement, you'll see that Reese, Volo, Dean, Enid, Lynette, etc. need to maximize their move during the entire mission, making this the tightest map to LTC I have ever done, giving me some FE12 chapter 12 vibe."

(Source: https://www.youtube.com/watch?v=j6DYxnEk5C8&t=1674s&ab_channel=Reploids)

Before the analysis begins, I would like to confirm what this player is saying. This is the most difficult map in the game, and it does indeed require precise movement. As far as I'm aware, 6 turns has been the fastest clear of this map, which means that you can't "skip" Berwick Saga's late game. Did I mention that I love Berwick Saga? Because I love Berwick Saga.

This will probably not come as no surprise to anyone who read my stuff on Berwick Saga, but I really do think this game has the best designed final map in the series. The best way to explain this is that Berwick Saga's final map really does feel like a "final exam" of the game. What's really cool about this final chapter is that it throws together a combination of powerful enemies that the player has had to deal with at least a few times previously in the game. 

  • Black Riders with spears that deal more damage with each hex traveled: Check.
  • Infinite range ballistic siege tomes: Check. 
  • A dark mage boss with a tome that levels people down? Check.
  • Super tanky Armored Knights? Check.
  • Multiple dark mages with Berserk and Sleep orbs? Check.
  • Powerful archers and crossbowmen with Overwatch that can halt your progress and snipe you? Check.

These are all enemies the player has had to face before. So whatever strategy the player had to use to beat them would be the same strategy they would use here. What is interesting is that all of these enemies are combined in the same level. Each part of the map feels like an obstacle course that requires a different strategy to beat. You're allowed to bring 15 characters and you really need to effectively utilize your team in order to win. 

Berwick Saga's final map focuses less on the final boss, and more on getting to the boss, which is a better recipe for success in terms of how final maps are actually made. 


Thracia 776 & Blazing Sword

I'm placing Thracia 776 and Blazing Sword's final maps in the same group because they're basically the same map: Fight powerful undead versions of bosses / characters that you've fought before closed off in different rooms before you get to the final boss. What makes these maps work is the same thing as what makes Berwick Saga's final map work: They focus more on getting to the final boss, rather than on fighting the final boss themselves. 


Between the two maps, I prefer Thracia's a little more since you have to split up your army, and seize multiple locations. Plus, Blazing Sword does emphasize fighting the final boss at the end when you get to the Fire Dragon a little bit more than Thracia does. That being said, they're minor differences in the grand scheme of things, and both deserve to be ranked like this. 


A Tier Final Maps: Radiant Dawn and Revelation


The next best final chapter in the series is Radiant Dawn's final map. Ashera is a much more interesting final boss to fight than most final bosses in the series. I appreciate how important Nihil is since you need to negate a powerful enemy skill that would otherwise deal quite a bit of damage. Ashera's AoE attacks are a fun way to spice up the map, and her Auroras can either heal her shield or deal damage. There's not much else to say about it, other than this map is very good. 


Fates: Revelation's Final Map: Anankos


I can't believe I'm about to say this but....Revelation's final map is actually pretty good. I know, it's shocking to say something positive about the map design of Revelation, but....this final map is very good. One interesting aspect is that Anankos himself is split up into three parts: His two hands and his head. In the meanwhile, enemy groups will spawn in different places in order to try and harass you. It's a unique design overall, but it works. As one commenter pointed out, "It can't be easily cheesed like Birthright's and isn't bullshit like Conquest's." (Source: https://www.reddit.com/r/fireemblem/comments/5fztpt/fates_map_discussion_thread_18_revelations_endgame/#s)

Just to recap, you're trying to defeat different parts of the boss while having to play around all the enemies who want to kill you. That's a different philosophy to how other games design their final map, but it ultimately works. I've also been told that the Heirs of Fate version is even better, with the Dragon Vein and with making the reinforcements an even bigger threat. Much like Conquest and Birthright, it is a major negative that you can't save on this map, and if you restart you go back to the map before it. Overall, still a fun, unique final map that comes from a surprising place.

Fire Emblem 1


This one is a map that I'm not super familiar with, so I'm basing this one of off what others have said. It's difficult to talk about maps like these, because the warp skip strategy exists. I don't hold warp skip against a map, since warp is capable of breaking lots of maps. So, for the sake of consistency, I'm not going to hold warp against this map. So, how does it play without the warp staff? 

You have to split your army into multiple groups, and then fight through multiple enemies in order to get through to Medeus. It's pretty easy to defeat Medeus, so the real meat is getting to him (assuming that you don't skip the map with the warp staff). According to Fire Emblem WOD, this map manages to throw a lot of enemy reinforcements, and will continue to ramp up the pressure. Credit given where credit is due, that's really good design. One particular issue is that since this is an old school game, it would be bothersome to adjust which character goes where. Yes it is possible, but repositioning units would be a hassle on a map where that's important.