Saturday, June 25, 2022

Berwick Saga Map Design Review Part 5

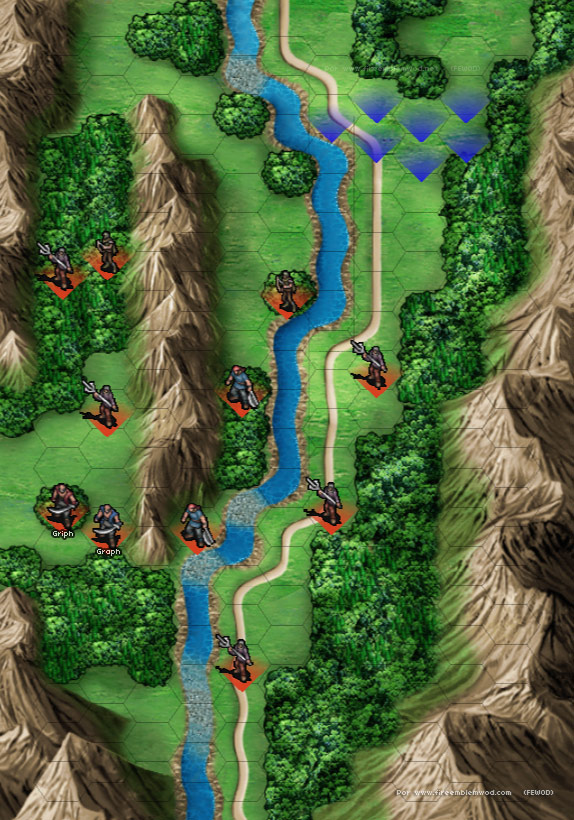
 Chapter 5 Gaiden - Mountain Hunt


The main objective of this map is to either defeat or capture the enemies on the right hand side of the map and then escape. These enemies will either be injured or crippled. Crippled enemies often have very limited movement, can't fight, or perform other actions such as using healing items. Injured enemies can be crippled if you deal enough damage to them. 


 There are invisible enemies on the mountains near the injured and crippled enemies. There's also a boss and some assassins off to the left, and a treasure chest in the corner. There are yellow units on the top right corner that might help these enemies, if you don't kill / capture enough of them in time. It's pretty easy to get to these enemies first, so it's not a big deal. The treasure chest is never threatened, so that isn't much of a positive for the map. It's an okay map, overall.

Overall Rating: Decent


Chapter 5 Gaiden: Lumiere


The easiest way to sum up this map is this: Mediocre and underwhelming. The main objective is to free the npcs in the bottom dungeon, and then help them escape to the top right dock. The path forward is very linear, and once again the treasure chest at the top is unthreatened. The only interesting part of the map are the enemy reinforcements that show up behind the player. This sounds a lot more interesting than it is. There's plenty of time to react to these reinforcements, and you can still play relatively slow while killing them. 

Overall Rating: Below Average


Chapter 6


The main objective here is to let at least 3 NPCs escape, and then to escape afterward. At the beginning of the chapter, there's a mage named Enid who has to talk to these NPCs. After she talks to them, they will move toward the to the bottom right hand tile to escape. There's also another mage named Perceval who will show up in the bottom left hand corner that she can recruit. There's an NPC at the top right corner near a shop that has to be talked to more than once. If you do, he gives you a nice, valuable forgeable item.  


What's neat is that the map forces Enid to go in multiple different directions, and there are usually three different areas from which enemies can attack the player. This requires the player to split their army up into three, and defend these enemies from three different sides. Unfortunately, there's a glaring problem: The enemy density at the beginning of the map is really low. There are very few enemies at the beginning of the map, which makes the beginning and middle parts of the map rather slow. The first half of the map can be a bit too easy, since the enemies will be relatively easy to kill.


Thankfully, the map gets more intense toward the end as more enemies show up. Once that happens, the map becomes a lot more fun to play. Here, you have to play fast in order to get your entire army to escape. This is when the player actually has to turn their brain on. 


Overall Rating: Decent


Chapter 6 Gaiden - Phantom Corps


This map is a snooze fest. It's an open field with no side objectives. The main objective is to kill or capture the boss. The boss is an armored unit with "Magicbane", a skill that forces magic users to re-roll their accuracy with a maximum accuracy of 33 %. Basically it makes magic users miss hitting him. This makes him marginally more difficult to defeat, but not that much harder. The only remotely interesting part about this map is that enemy reinforcements spawn at various points in time. Even then, they don't really impact the way that this map is meant to be played. How lame.


Overall Rating: Fail


Chapter 6 Gaiden - Food Supply


This gaiden chapter is better than the previous one. At the start of the map, there are enemies that will run away from you, who are carrying food. These enemies will drop food after you kill them. After the map is finished, you get paid more money for each bag of food that you bring back.* These enemies start out at a relatively far distance from the player, and will to try to escape off the map, so the player does have to move with some speed, if they want to get all the dropped food.

*(Don't quote me on that. I could be wrong. If anyone is more knowledgeable about how this works, feel free to comment on this)

The boss on the throne will run away after being attacked once. Since he's on the wanted list, you'll want to either kill or capture him. It's more fun to try and figure out how to kill / capture him. There's an extra side objective that can make the map more challenging in a fun way: The yellow units on the cliff.


If the player leaves them alone, they won't do anything. However, if the player chooses to come near them, they will attack. They're all really tough to kill, which makes the map a bit more fun if the player goes for this side objective. The main benefits are high amounts of experience, since the yellow units are all high level enemies. I believe one of them drops something, although I'm not 100 % sure. The map is not half bad, and has enough to it to keep it entertaining for what's supposed to be a fairly short gaiden chapter.


Overall Rating: Decent


Chapter 7


Despite what this picture may suggest, this is actually a Fog of War map. The main objective is to rescue this NPC called Vester, and then escort him and the other captured NPCs to an escape point on the left-hand side of the map. There are two doors that need to be broken down, in addition to a tanky armored boss, a bunch of archers, and several armored spear wielding enemies. Oh, and you need to get Vester to the escape point (while having all your units) escape by 24 turns. The turn limit is relatively forgiving, but considering everything that you have to do, that turn limit can sneak up on you, if you're not actively moving forward every turn.


Even after dealing with the enemies on the fort, you still have to deal with all the enemies near the escape point. Interestingly enough, this requires the player to split their army up into two different groups. There are several houses throughout the map that will give the player stuff. One of them is really off to the side, which requires some strategizing on the player's part to make sure that whoever goes to that house can still escape in time. Oh, and there are enemies that will try to attack the player from behind too. Overall, this map is exciting, and I've enjoyed playing it in every playthrough.


Overall Rating: Excellent


Berwick Saga's Map Design Tally So Far
  • Excellent: 6
  • Pretty Good: 1
  • Decent: 5

  • Meh: 2
  • Below Average: 2
  • Fail: 3

Thursday, June 9, 2022

Berwick Saga Map Design Review Part 4

 Chapter 3 Gaiden: The Maiden and the Mercenary


Here we have the first fog of war map in the game....and it sucks. This map has two objectives: Get your mage Aegina to talk to an NPC, and then Seize. This map has one glaring oversight: It doesn't account for how awesome Sherpa is. Sherpa is basically a promoted Mercenary who is the only character in the game that has a traditional Fire Emblem style enemy phase. Everyone else in your army cannot counterattack if they get hit by an enemy. Sherpa can. In addition to being able to actually counterattack, Sherpa also has a stupidly powerful prf rank sword, the Brymranger, that can attack multiple times consecutively. 


These factors all mean that Sherpa is plenty strong enough to solo all the enemies and the boss near the seize point. As a result, it really doesn't matter which characters you pick, because Sherpa's all you need. Thankfully, as powerful as Sherpa is, he won't be able to break any other map in the game by himself. That still doesn't change the fact that this map is super easy to break.

Overall Rating: Fail

Chapter 3 Gaiden: Thieves and Ponies


This gaiden chapter happens to be a solid one. There are thieves in the top right corner of the map who are trying to steal horses. Kill this thieves, or get the horses first, and they go in your inventory and can be used later. Horses in this game are treated like another resource that the player is expected to manage. They have HP, take damage with their rider, and when their HP reaches 0 they die and never come back. Horses can be bought, but they're relatively expensive.

All of this explanation is to say that horses are valuable, so when this chapter gives you the opportunity to have more, you will book it. As a result, this works as an effective turtle disincentive. Terrain is also cleverly implemented to act as an obstacle to the player. The boss, Seamus, moves from his fort and can run away from the player if his HP gets too low. (I could be wrong about this, so feel free to correct me, if I got that part wrong) Killing or capturing Seamus nets the player a good deal of gold, and Seamus isn't a pushover. Overall, this map is pretty good and is fairly fun to play.


Overall Rating: Pretty Good


Chapter 4


This is an escape chapter that's designed as a defense level. At the beginning of the map, there are wounded NPCs who are trying to escape. At least 7 of the 12 NPC allies have to escape. Once they've escaped, you have to have everyone in your army escape by 24 turns. Another important note is that whenever someone in Berwick Saga is crippled, they might not be able to move their full movement range. This can further complicate the map, since you'll have to defend your allies for a longer period of time than you normally would had their movement been normal. 

This part of the map is fairly simple since all you really need to do is move to the center and put your tanky characters in the chokepoints. However, this map has several side objectives which make it more interesting to play. There's a random spot in the north that has a secret item, there are several bandits on the left that drop valuable axes, and there's a side objective of collecting droppable shields from enemies.


There are two recruitable characters on this map: Daoud and Larentia. Larentia is the only flier that you get in this game, and Daoud is an Axe Knight. If you want to recruit Daoud, you need to make sure that all 12 NPCs escape. Larentia will talk to Reese on her own and will essentially recruit herself. 

Another side objective that I almost forgot about are the assassins that will also show up on the left. They provide gold, experience, and droppable items. It's definitely worth it to kill them. 

What's interesting about escape chapters in Berwick Saga is that they lure you into a false sense of security. It's really easy to think that you'll be able to escape far easier than it actually is. The terrain on this map limits movement, so it can and will take you longer to flee. This actually puts a great deal of pressure on the player, which makes the map more exciting and fun to play.

Overall Rating: Excellent


Chapter 4 Gaiden: Color Chord


Here comes the second fog of war map in this game. It's also not very good. There's no turtle disincentive and most of the enemies are relatively weak. The only noteworthy part of this map is the boss, Penelo. There's a special cutscene that happens if you get Sherlock to attack him first. It breaks an item of his that otherwise would put your characters to sleep. Unfortunately, his avoid is high. Like, really high. Think Gel from Binding Blade Sacae Route. Fighting Penelo feels like a massive gamble because getting an accuracy of 50 % or more on him can be a real struggle. He also has Vantage, which is even better in this game because the moment somebody gets hit is the moment that combat stops. So what I'm trying to say is...


Overall Rating: Fail


Chapter 4 Gaiden: Children's Hero


While this gaiden map is better than the previous one, it's still on the underwhelming side. The main premise of this gaiden chapter is to have your thief Sedy seize a house on the top left portion of the map. Meanwhile, you have to avoid stepping into the range of all the yellow troops on the top right corner of the map. 


There's a spot on the map that will lower the drawbridge so that the rest of your army can cross over to the other side. Most of the enemies are weak, except for the boss and the goons right by him. Enemy reinforcements will show up, but by the time that they do, the player will most likely be close to beating the map. There are no side objectives here, and not much else noteworthy going on. Like I said before, this map is underwhelming.


Overall: Meh


Chapter 5


This map is a defense map that can be beaten faster by killing the boss. It also has a couple of smaller side objectives in the form of capturing an enemy thief, and collecting stuff from a nearby house. There isn't really much to say about this map. Various enemies will drop items for forging or weapons and gold. There's also a recruitable Armor Knight called Marcel. You just have to talk to him with Reese. 

There's a house that can bring your troops behind enemy lines straight to the boss. Keep in mind that the boss is tanky, and Goebbels (yes you read that right) is a really strong miniboss that will wreck anyone nearby. Overall, this map can either be played super fast for the LTC vets, or it can be played like a simple defense map and both types of players will find something to enjoy here.


Overall Rating: Decent


Berwick Saga's Map Design Tally So Far
  • Excellent: 5
  • Pretty Good: 1
  • Decent: 2

  • Meh: 2
  • Below Average: 1
  • Fail: 2


Monday, June 6, 2022

Berwick Saga Map Design Review: Part 3

 Chapter 2-1: In Pursuit of Thieves


Of the first few chapters in the early part of Berwick Saga, this is easily one of the worst designed. I tried to find a better picture of this map, but this is the best I could do. As it shows, The map is a little too straightforward:

1) Go to through the narrow part of the map and kill the relatively easy enemies.

2) Unlock the doors to get horses in your inventory (yes, that is a thing you can do in Berwick Saga) and the treasure.

3) Rush the enemies near the throne, kill the boss, and seize.


There are no turtle disincentives, the enemies are fairly easy in this chapter, and the treasures are never really threatened. There's not much else to say about this map. It's low key and pretty boring.

Overall Rating: Below Average


Chapter 2 - 2: Combat Training

This gaiden chapter is fairly interesting. It has a couple of neat side objectives that spice things up, and it rewards fast gameplay. Those interesting side objectives are:

1) There's an enemy that drops a rare Repair Stone. Instead of having Hammerene staves, this game has repair stones which will replenish weapon uses. There are roughly 2 - 3 of those in the game and this is one of them. That enemy leaves fast so you have to hustle to get it. 

2) There's a second enemy near the top of the map that's carrying arrows over to a ballista. If that enemy succeeds, then the ballista will have actual weapons to fire at the player. For obvious reasons, we want to stop this enemy from delivering those arrows.


Enemy reinforcements will also show up right behind the player, which creates even more incentive to move fast. So yeah, this map knows how to make the player move fast. The one problem that I have with this map is that once you're able to complete the side objectives, the map quickly loses steam. After a couple of turns, you can complete the map at your leisure. Still, I think it's noteworthy for those first few turns.

Overall Rating: Decent 


Chapter 3: The Three Bishops

Chapter 3 gets my vote for being the best designed map in the game. I realize that having that title designated for a map this early into the game implies that the maps in the later part of the game suck. This could be further from the truth. There are a lot of well-designed maps that are fun to play. This map, however, is on another level. 

The main goal of this map is to escort three NPC bishops to a seize point on the opposite side of the map. A map design thread on reddit summed up how the three NPCs act on this map:

A couple of things about the priests:

  • You can't control them and they will not wait for you. They will always try to move forward, except if there as enemy in the way or if your units are blocking specific tiles.
  • Each priest will take a complete different path. Do you see the white tiles? These are "road" terrain and each priest will follow one of the routes.
  • The priests are indeed very fragile. Also, each one must stop at a certain point for special events along the way.
  • All 3 carry healing magic and heal your units under some circumstances.
Source: 

So yeah. They will move in 3 different directions, and in order to keep up with them, you have to move pretty fast. 


This map reminds me of Conquest Chapter 17, where you have to protect Saizo, who is an NPC that will continue to move forward. Funnily enough, Berwick Saga came out about 10 years before Fates did, so technically Conquest came up with a similar idea to what Berwick Saga did here. Personally I think this map's execution is better since there's no Dragon Vein to trap these NPCs. You have to move forward, and there's no way to trivialize this aspect of the map.

The central path is near water, where pirates will walk on it and try to swarm the bishop. Each bishop will visit a house halfway through their route. These visits will trigger unavoidable events. One of these events reduces that bishop's HP by 15. If you don't want the bishop to die, you'll have to make sure that his HP is higher than that, which puts even more pressure on the player. Another house is guarded by a stupidly powerful boss named Chaos. The best way to deal with Chaos is to bring Faye, who will talk to Chaos, and a prescripted event will ensue.


The overall effect is that the player has to put a ton of thought and effort behind who goes where, and how they're going to beat the level. The boss also spams a skill called War Cry, which stacks the damage that he deals and his hit rate. Despite being at the seize point, said boss will move out of his spot to attack your units. Those War Cry stat stacks are scary, so be warned.  

In case all of that wasn't enough, this map is chock full of side objectives! There are 4 citizen requests that can net you extra money and items in addition to two different houses that also give you stuff on opposite ends of the map. There's a recruitable character and a mini-boss that shows up behind the player. Killing that mini-boss is tough. Like, he has a knife that gives him an automatic 80 % crit rate. No, I'm not exaggerating or being hyperbolic. It's literally 80 %. He also runs away off the map super fast, so you only have a couple of turns to kill him. That being said, killing this mini-boss results in the player gaining extra money, which makes it worth it. 


Then there are enemies that drop various amounts of money on the top left corner on the map, that act as their own fun side objective. Oh, and the pirate fort also contains treasure for your pirate, Axel, to take.

In conclusion, this map is beautiful! It's tough, it requires huge amounts of planning and forethought, and there's pretty much something for everyone in your army to do. It's only tough during your first playthrough. On subsequent playthroughs, it gets easier as you learn how to handle the obstacles thrown at you. It definitely feels rewarding to both play and beat this level. Easily one of my all-time favorite maps to play from a Fire Emblem inspired game. It's up there with the Manster Arc and escape maps in Thracia 776.

Overall Rating: Excellent!!!

Berwick Saga's Map Design Tally So Far
  • Excellent: 4
  • Pretty Good: 0
  • Decent: 1

  • Meh: 1 
  • Below Average: 1
  • Fail: 0

Sunday, March 27, 2022

Berwick Saga Map Design Review Part 2

 Chapter 1 - 1: Cruel Brothers


Here we have the first gaiden chapter in Berwick Saga and it's kinda bleh. This map is a kill / capture boss map. You basically move down the map and kill every enemy in your way. There are no turtle disincentives, and the closest thing to a side objective that happens is an enemy that drops a small amount gold near the bottom of the map. What's also sad is that there really isn't a reason to go to the left side of the map. The enemies don't drop anything, and it actually takes longer to reach the boss if you head down the left side. 

Speaking of the bosses, there are two bosses: Griph and Graph. If you attack Griph, a cutscene occurs where an archer named Sylvis cripples him and leaves. The map ends when this happens. Graph is tough to fight, but he drops money and an item that you can use for forging. My recommendation is to kill Graph first, and then fight Griph. 

Conclusion: I think this map would have benefitted from having more going on. A turtle disincentive and a more compelling reason to take the left route would have worked wonders for this map. 

Final Rating: Meh 

_______________________________________________

Chapter 1 - 2: The Young Knights


Here we have the first fog of war map in the game, and it's actually rather creative. Berwick Saga changes fog of war so that enemy vision is just as limited as the player's vision. This makes fog of war maps fair and interesting. This particular fog of war map begins with the player only controlling two characters: Ruby and Arthur. Ruby is your stereotypical underleveled character that veterans of the series dislike, while players who enjoy leveling up weak characters love. Her accuracy and damage output here sucks. Arthur is a decent unit who can hold his own. You spend a couple of turns with these two before the rest of your army shows up.

This map does a couple of interesting things that kind of act as a tutorial of sorts. The boss you need to kill for this map has a Berserk orb. There's an injured enemy that shows up halfway between the player and the boss that drops an item that cures the berserk status. Despite this map being fog of war, it's actually pretty easy to find this enemy and capture him before he runs away. 

There's another enemy who's looking to give the boss a powerful weapon that will let him 2 hit KO your troops. Once again, you need to play fast in order to prevent this enemy from giving the boss that  weapon. Before I forget, there are also enemy reinforcements that show up behind the player by a certain turn. This further succeeds at getting the player to play faster.

Overall: This map works as a brilliant tutorial for how both fog of war and the berserk status work in this game. It also does a pretty good job at getting the player to play faster. 

Final Rating: Excellent

_____________________________________

Chapter 2: Bandit Suppression


Here we finally get to the second main chapter of the game, and boy is there a lot to do! I'll start by listing all the side objectives in this map:
  • Defeat Kerusa (an optional enemy) and obtain the Crystal Ring.
  • Defeat or capture Harrington (an optional boss).
  • Visit the house near starting point, then visit another house near the boss. A fight ensues and after winning you will retrieve a Medicine Grass bundle.
  • On turn 12 a very dangerous enemy swordfighter, Zacharias, will appear in one of the northern caves. He has pretty high stats for this part of the game and will two shot your units. Running is an option, but capturing him does reward the player with an accessory.
  • On turn 16, Fabian appears near the river on the bottom left with a droppable treasure item (5.000 gold) and 2 very rare knives.
  • On turn 18, Talivan appears with a droppable Power Brace in the south forest. Since turn 18 is the last turn for the max mission rank, he must be killed in one turn if the player is going for that.
  • If Czene talks to Reese, a gaiden chapter is unlocked.

As you can see, the list of side objectives for this map is HUGE! It's easily the best part of this map. This is pretty indicative for how a lot chapters in Berwick Saga play: You have a simple main objective compounded by numerous side objectives. The side objectives are usually very interesting, and make the maps fun. This map is a prime example of doing that. 

This map will also introduce you to three new characters: Faye, Kramer, and Czene. Faye is a fragile myrmidon who is the only character in the game that can eventually learn Astra. She's also necessary for recruiting Faramir, who is one of the best units in the game. Kramer is a mercenary that has Arrowbane, a skill that gives him a 67 % chance to dodge arrows. This is a super important skill, because enemy bow users and ballista are really scary in the late game. He also can knock enemy shields away and is the only unit that doesn't suffer avoid penalties when climbing cliffs. Czene is a thief that can search invisible enemies, can hide in specific terrain, and can open doors and chests. She also gets a horse upon promotion. 

In terms of turtle disincentives, the map has to be beaten in 24 turns, which is generous but given all the side objectives that you can do in this game will come faster than you think. There's also an injured enemy that you can capture, who is far enough away from the player that you do have to hustle to get him and his loot. 

Two more noteworthy things to bring up
  • There's an annoying Bow Knight named Pizarro who will perform hit and run tactics near the river. There are some fun strategies to take him down, but he is nonetheless an obstacle to be dealt with.
  • To quote that same reddit page again: "A named enemy (Zaaro) near's Faye group is carrying a Sword Breaker dagger. As the name implies, it has a 33% chance of instantly breaking swords on hit, including the personal one Faye starts with. This is some Thracia 776 level trolling."
 (Source: https://www.reddit.com/r/fireemblem/comments/3fx2d8/berwick_saga_map_design_thread_chapter_2/)

Overall: This map has a lot of side objectives. It ends up making the level extremely fun to play. There's always something for everyone to do. You'll have to make use of everyone in your army, and figure out how to cover multiple fronts. 

Final Rating: Excellent


Berwick Saga's Map Design Tally So Far
  • Excellent: 3
  • Pretty Good: 0
  • Decent: 0 

  • Meh: 1 
  • Below Average: 0
  • Fail: 0

Saturday, March 26, 2022

Berwick Saga Map Design Review Part 1: Analyzing The First Chapter of the Game

 Yesterday I beat Berwick Saga for the second time. I think I have a good enough idea of how the game plays where I can start reviewing the map design. So here we go...


Chapter 1


Chapter 1 of Berwick Saga gets my vote for being the best designed first chapter of the Fire Emblem / Fire Emblem adjacent games. Instead of getting to play with only three units or less, you get a total of nine units to start out with. This increases the number of potential strategies and ways to play the game.

What separates this map from the other first chapters is that this map has two different turtle disincentives. The first comes from the fact that your healer Izerna and your fighter, Dean, start out at the opposite end of the map. Since Berwick Saga uses hexagons instead of squares for its grid, there are six potential spaces from which to attack someone at 1 range. This means that protecting your healer is significantly harder to do. If you want to keep your healer alive, you need to send some troops over to her fast. 
Fun fact, there's another route at the top of the map where you can send your troops around to get to your healer on the other side.

Another turtle disincentive comes in the form of two enemies that drop 1,000 gold each if they die. These enemies will try to run away from you, and will permanently leave the map if you let them. So that makes for two turtle disincentives on the first chapter of the game! That's incredible!


Near the start of the map is a tanky mini boss named Bernard that will be preventing you from moving toward the middle of the map. It takes a little bit of time to kill him and you'll definitely need Ward, the Jagen of the group, to finish him off. There's also a fun side objective near the boss in the form of a village with a question mark. Any unit who enters there will participate in a pre-scripted battle where your character will win, and they'll be rewarded with a neat little item. 


To finish off, I'd like to quote the Berwick Saga map design thread on reddit:

So, to recap. On the first freaking map of the game we have:
  • Multiple bosses.
  • Good map layout with 2 avenues of approach.
  • Good checkpoint abuse by the enemy forces.
  • 2 "timed" side objectives (one including recruitable characters) that use everything at a player's disposal.

Thank you based Kaga.


Berwick Saga's first chapter gets a 10 / 10. 

Rating: Excellent!

Sunday, March 6, 2022

Updated Holy War Randomizer Run

 I've always wanted to try a randomizer run. I decided to start with Holy War. There were a lot of different settings with which I could customize my character's class, Holy Blood, and skills. I'm about to finish Chapter 5 right now, and I wanted to show my team off. 


Aideen became a Falcon Knight, and was pretty powerful all around. I had a lot of fun having her wreck face all throughout the game. One funny note is that Dithorba's squad in Chapter 4 refused to attack her because her defense was so high that she wouldn't take any damage from them. They just flew around her and did nothing while Aideen skewered them all. It was hilarious!


Sigurd being a Bow Knight was a cool twist, because he was still strong, but he couldn't really solo the game. He had no enemy phase. Giving him Sol was interesting. One thing I can say about this Sigurd is that he was a tank. It was difficult for enemies to deal meaningful damage to him. The Bow Knights that attack you in Chapter 5 refused to attack him because they couldn't deal damage to him.


Having a Wyvern Knight was a fun addition to the first generation. Giving Midir Critical and Luna really made his combat shine. The only issues with him are his lack of resistance biting him in the butt when an enemy mage lands an attack, or his inability to double attack faster enemies at times (hence the presence of the Speed Ring). Overall, he was still really fun to use.


Holyn was essentially a charisma bot healer that rapidly gained a lot of experience. He was my go to healer for most of the run.


It was hilarious watching Claud one-shot many an enemy with a simple Elfire tome. I wish he had a little more avoid, since there were times where he died because the enemies managed to land a couple lucky hits on him.


Ayra was pretty amazing! She's fast, powerful, and pretty durable. I included the kill count for her Brave Sword, because of how hilarious it was to watch her kill everything with it. Heck, I just had her fly up to Lex's dad, Duke Lombard, and she landed a crit on him like he was nothing. None of the Armored Knights with bows nor the ballista could hit her. Easily one of the strongest units in this randomizer run.


Master Knight Arden was a surprise to be sure, but a welcome one. He's another standout unit that killed anything I wanted him to kill. It was awesome giving him Forseti, only to see that Forseti got the Mystletainn's stat buffs. Forseti's still a strong weapon, but it's disappointing how much of a downgrade it is in comparison to its regular version. Once again, the dude's a total tank who just didn't care about taking damage.


Overall, I'm having fun with my Holy War randomizer run. There are only two complaints that I have:

1) Some weapons have awful hit rates:


Hit rates that low make a weapon unusable. Accuracy became the signature trait that I looked for when giving weapons to my team.

# 2) Holy Blood that didn't correspond to their weapon ranks:
Most of my group can't use the Holy Weapons that are linked to their Holy Blood. Even though I repaired the Tyrfing, I forgot about one simple fact: Nobody on my team could use it! So I had to sell it, which made me sad. Oh well.