Thursday, August 31, 2017
Saturday, August 26, 2017
Thracia 776 Map Design Review: A Route, B Route + Chapters 18 & 19
Chapter 16A
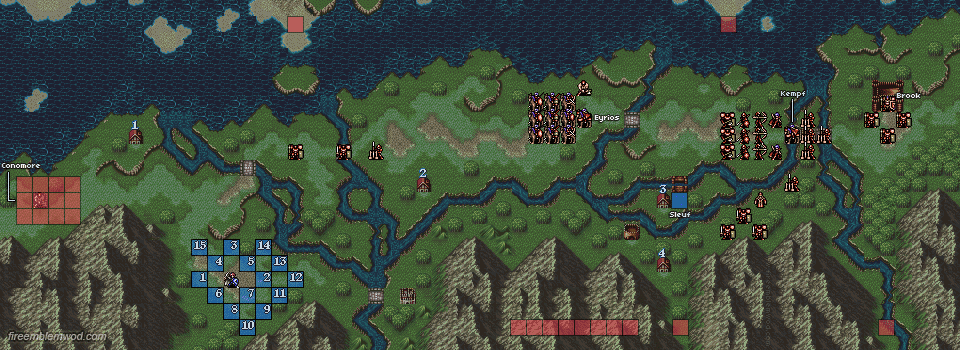
Now this is what I’m talking about. There are two routes to approaching this chapter. The first involves dealing with Eyrios’s group. The second involves the lower house where Sleuf joins the player’s group. Eyrios is interesting in that he’ll join your group if Olwen is either dead or was never recruited in the first place. There’s a discussion to be had about who’s better (although the last time I checked most people said it was Eyrios) and what the trade offs are.
Whatever side of that debate you’re on Eyrios’s presence does add an extra element of strategy to the level because the player either needs to recruit him, which makes the map trickier, or needs to kill him due to his high movement and ballistic siege tome. The map has three turtle disincentives in the form of brigands who threaten the villages in the map. If the player moves along the southern route pegasus knights will show up and can ruin the player’s day. If the player’s playing especially slow then Conomore and an army of cavaliers will appear from where the player initially began and will charge at the player. Moral of the story: You better play fast on this map.
Kempf acts as a mini boss on this map and he’s also backed up by a load of ballista which can make approaching the map even more difficult. The boss here is alright. He’s got a ranged brave lance, an armorslayer and a knight killer so you do have to pay attention to what kind of unit you use to deal with him.
Overall Rating: Excellent
____________________________________
Chapter 17A

Fun fact: I’ve already done a review of this map before. You can read it here:
I still stand by what I said in that review too.
Overall Rating: Excellent
_______________________________________
Chapter 16B

This chapter has some pretty annoying aspects to it. For starters the map throws random, hidden warp tiles at the player that will send the player’s units to random spots on the map. Usually these spots send the player’s unit backwards. Crap like this reeks of the Guide Dang It! trope which always counts as a negative for stuff like this. True you can deal with it by moving on the square and using an item but in order for that strategy to work the player has to already know where the tiles are. To make matters worse there are certain tiles of the map that the player is not allowed to move on.
The good news is that there are positives to this map. The boss may have a berserk staff but this time he’s in a position that the player can reach so unlike previous chapters you don’t have to use warp in order to get to him. There are also a lot of goodies to either steal or capture (an extra Pugi, a Luna manual and a couple of Master weapons for instance). The map gives you three recruitable characters and sadly only one of them is worth recruiting: Sara. Overall, I’d say the negatives outweigh the positives here.
Overall Rating: Below Average
___________________________________
Chapter 17B

This chapter is odd. The enemy unit density is pretty tame, but there’s also an abundance of ballista. This prevents flier skipping, although the lack of another bridge means that if you want to get to the left side of the map without going the long way around you basically have to ferry your units with a flier. The villages in this chapter seem pointless since you can get the Knight Proof at the end without ever visiting them. Visiting the villages results in NPC allies, but in order to get that same Knight Crest at the end of the map the player has to keep them all alive. It’s way easier to ignore the villages and the payoff is the exact same so why bother visiting the villages?
There are two ways of approaching this map. The first is on the far left. It requires a lot of para dropping but there are far less ballista in that route. Then there’s the route to the far right. It has way more ballista and you can open the gate for a mere 20,000 gold in a game where gold is really hard to come by. Why would we choose that route again? The chapter’s only turtle disincentive arrives once the player is close to the boss. This further incentivizes approaching from the far left since you’ll be farther away from Amalda’s troops and will thus have more time to deal with the boss.
Overall Rating: Meh
______________________________________
Chapter 18

So this map is interesting in that it can either be extremely frustrating or it’s not that bad. Xavier’s recruitment is what makes the difference. If the player chooses to recruit him, the chapter is going to be pretty frustrating due to the fact that it requires getting random NPC’s over to different enemy generals who will attack them. The game never tells you which NPC goes to which general which adds to the frustration. If I were to make a “Top 10 Characters with the Hardest Difficulty Requirements” Xavier would easily be # 1.
There’s another really difficult item to get called the member card that requires the player to keep all the Lenster soldiers alive. The member card only has one use, which is pretty stupid if you ask me.
The good news however is that both Xavier and the Member Card are optional and neither of these is important to beating the game. I’ve never even bothered to recruit Xavier or get the Member Card and I’ve beaten Thracia 776 4 times. On the other hand I will downgrade the chapter for requiring a huge amount of effort over two things that are definitely not worth it. On the other hand, I don’t think either of these things are enough to warrant a fail or below average rating on their own since they can be skipped and should the player choose to skip both of these then the map plays differently.
Enemy reinforcements in this map are weird in that they arrive all over the place and a good number of them show up too early to count as turtle disincentives. Most reinforcements show up later and do act as turtle disincentives. The treasures marked as 1 or 2 are threatened by thieves, which act as turtle disincentives. The map also splits the player’s units up into 2 groups and provides two means of approaching the map.
I’m going to give this map two ratings because of how big of an impact Xavier’s recruitment is on playing it.
If the player does not try to recruit Xavier: Decent
If the player does try to recruit Xavier: Fail
- Fun fact: This is not the only chapter that will ever get two different ratings. There are two maps in Conquest that get two ratings because of how differently they play out between Hard and Lunatic mode. Fire Emblem 12 will most likely have a lot of different maps with two ratings because there are a good amount of chapters that play differently between Maniac and Lunatic mode.
- For this chapter I’m going to use the higher rating since recruiting Xavier is optional. The change in rating for this map isn’t based on difficulty like the ones in Conquest or Fire Emblem 12 which makes it a special case.
_____________________________________
Chapter 19

This map is pretty stinking cool. A significant percentage of the player’s army starts near the enemy’s army with the enemy consisting of mounted units. Meanwhile the player still has troops at the top of the map right next to the escape tile. You’d think this map would be super easy to trivialize right? Wrong. It’s a Thracia Escape chapter so the player has to get all of their troops to that tile. There are also green NPC units that need rescuing. If they all escape then the player gets a Knight Proof. There are also Brigands that approach from the right who will make a beeline for the villages which make this chapter that much more challenging. There are also even more thieves near the top of the map who will also make a beeline for the villages.
In short, this map will punish the ever living crap out of turtling. What’s even cooler is that the two armies chasing the player are led by recruitable units. The catch here is that the enemy commanders can only be recruited by characters that the player visited during the route split. That means that only one of them can be recruited. However, recruiting is tricky because these units will inevitably be surrounding by other enemies who can kill them pretty easily. That means that the player will actually be required to think about how they’re going to recruit these characters, which makes this map even more strategic. Good luck killing the boss too with all the ballista and powerful enemies by his side. That being said it’s certainly not impossible to achieve.
Overall Rating: Excellent
______________________________________
Thracia’s Map Rating Score So Far:
Excellent - 9
Pretty Good - 4
Decent - 5
Meh - 2
Below Average - 3
Fail - 5
Thracia 776 Map Design Review Chapters 11x - 15
Chapter 11x

I’m not the biggest fan of this map either. There’s only one approach to the boss and it’s a bit too simplistic for my taste. The map also doesn’t really disincentivize turtling. In fact, one could argue that it encourages the player to play more slowly. There’s the fact that you have to keep Olwen and the NPC kids out of the boss’s ballistic siege tome range and there’s the fact that the boss leaves on Turn 30. The only enemy reinforcements show up on Olwen and Fred’s side of the map too. The hallway of death at the beginning is pretty cool though.
Overall Rating: Fail
_______________________________________
Chapter 12

Chapter 12 is a map I’ve underrated in the past but a closer analysis reveals that it has more merit than I initially gave it credit for. You’ve got two houses that are threatened by bandits that you have to hurry up and save. The forest tiles make saving these houses more difficult. There’s a brigand that has a bridge key you could capture or steal which lets you unlock the bridge at the top. Or you could rescue ferry Leif over the water. This map is big enough to where rescue ferrying can augment rather than hurt the design. The gaiden chapter turn count requirement is also a bit too generous.
Salem is pretty annoying on this map since he can sleep staff your units from any part of the map. It’s a cool idea to have a boss with a status staff but the only real way to deal with him (besides using a restore staff) is to warp a unit over and capture the boss which in my opinion counts as a negative.
I should also point out that a large percentage of enemies have the Steal skill which makes the map annoying, but can also cause the player to think more carefully about their next moves.
Overall Rating: Decent
_____________________________________________
Chapter 12x

Another gaiden chapter that I’ve never been a fan of. Like the previous chapter there’s an enemy with an infinite range staff that gives you really only two options to deal with: Warp or let her take your stuff from you. I’m not going to negatively rate the map for warp skipping, but it is fair to point out how it basically requires warp skipping as the only means of dealing with said Thief staff.
There’s only one approach to the boss and more importantly there’s a turtle incentive in the guise of dancers that show up on Turns 25 & 30. One of them has a Knight Proof while the other one shows up with a Warp Staff. You could argue that the thieves trying to get the treasures count as a turtle disincentive but they’re so close to them that you practically have to use warp anyway. Also, the Knight Proof treasure continues Thracia’s tradition of weirdly placed treasure.
Overall Rating: Fail
_____________________________________
Chapter 13

Alright another cool escape chapter! Like Chapter 9 the enemy army here qualifies as a turtle incentive since they threaten the Lenster army guarding the escape tile. This time around this army is even closer to the escape tile than the one in Chapter 9 so the player absolutely has to blitz over there. The mountain range and length of the map makes rescue ferrying once again augment the map but also difficult to accomplish due to the presence of the ballista.
Meanwhile the normal non-flier route has ballista to keep the player in check along with armor knights and cavaliers to make sure that reaching the escape tile is actually challenging. Interestingly enough defeating the boss before Turn 32 in this chapter actually results in having to deal with more enemy reinforcements. The chapter provides treasures that are in difficult spots to get too and they’re actually worth it.
Overall Rating: Excellent
___________________________________
Chapter 14

Defense chapters are a funny thing in the Fire Emblem fandom. If you play them casually like I do they’re a ton of fun. They’re different, they usually have a pretty good atmosphere about them and they can require the player to play defensively. Hardcore LTC veterans generally don’t like them because of how easy they are to trivialize. So I feel like no matter what rating I give this map somebody’s going to take issue with it.
An easy way for me to downvote a map comes in the form of whether or not the map is easy to trivialize or not (the key word being easy). According to both Ronaldo and Dondon151 there is an easy way to trivialize this map. You can block off the armor knights and dodge the ballista until the end of the chapter. Sure there’s other things to take into consideration like Dean’s Dragon Lance, Homer’s recruitment and visiting enough houses to get to Chapter 14x but these don’t really make up for the fact that breaking this chapter can be done with relatively little effort. For the sake of fairness and consistency I’d have to say that that constitutes as a major downgrade in terms of rating it. That’s what I’d be doing if this were a map from a 3DS game so I won’t pull any punches for this map.
Overall Rating: Fail
____________________________________
Chapter 14x

Another Fog of War gaiden chapter with issues. Boy this is getting repetitive. Enemies spawn from random areas which makes dealing with them more tedious than difficult especially when a good chunk of said enemies are Pegasus Knights that can move all over the map. Fog of War actually hurts this map since it prevents the player from seeing these enemies which makes planning around them more difficult than it needs to be.
NPCs show up and for each NPC that escapes the player gets a Stamina bag. I love the concept but the execution is a bit off. The problem I have is that the NPCs show up at the bottom of the map and can easily get captured by Pegasus Knights that show up out of nowhere. The more NPCs the player has to rescue the more reason the player has to play slowly. In other words, this map incentivizes turtling. Once again there’s only one route to the escape tile and there’s mountain tiles which slow the player down while getting bombarded by Pegasus Knights from all sides.
Overall Rating: Fail
_____________________________________
Chapter 15

Well there’s a super easy way to trivialize this map: Either Warp or ferry Leif to the church and you’ve beaten the map. Nothing else really matters.
Overall Rating: Fail
___________________________________________
Thracia’s Map Rating Score So Far:
Pass - 6
Pretty Good - 4
Decent - 4
Meh - 1
Below Average - 2
Fail - 5
Overall Thoughts: From a map design standpoint I’d say this is the weakest part of the game. The good news is that this is the exception and not the norm for Thracia 776 (which is more than what most other games can claim). These maps feature a lot of annoying elements that either require warp or they’re easy to trivialize. Apparently Kaga didn’t put as much effort into the gaiden chapters as he did into the regular ones. Based on what I’ve seen in the other games I’d say that there’s a trend of gaiden chapters being less well designed as the maps in the main campaign. The good news is that the two remaining sections should be less critical and more fun to talk about.

Since this will most likely be the most controversial part of the Thracia Map Design Analysis section I’d be interested in hearing your thoughts on these maps.
Tuesday, August 15, 2017
Thracia 776 Map Design Review: Chapters 6 - 11
Chapter 6

Now this is an escape chapter! Chapter 6 gives you two routes to escape from. It gives you the route to the far right and the route by the doors. The map is augmented by Karin’s ability to rescue someone and fly over the walls. If you rescued the NPCs in Chapter 4x then this map is the payoff for that. The houses all provide wonderful goodies for the player that make visiting them worth it. Visiting the houses will come with a price though. It not only slows the player down, but it also means that the enemy army has more time to catch up to the player. This provides the player with a cost-benefit analysis that everyone who’s played Thracia will have surely had to figure out. Enemy reinforcements show up behind the player so if you take too long you will suffer the consequences. On Turn 15 Galzus will show up and will wreck you if you’re foolish enough to get in his way. In short, this map has everything a great map should have.
Overall Rating: Excellent
_______________________________________
Chapter 7

This map provides two routes to approach it, however the left route has so many enemies that you’ll probably avoid it and head down the center. The enemy unit density will most likely consist of only Shiva’s group and the reinforcements that show up behind the player. Speaking of that there’s a little trick where you can put one of your units in a certain spot (it’s the spot that the WoD map says is when Eisenhow is supposed to show up) and you can limit the number of enemy reinforcements that come at you. Instead of having 3 cavaliers charge at you it’ll be just one.
Keep in mind that this doesn’t prevent the other enemy reinforcements from showing up like the mages and bishop that are supposed to appear on turns 6, 7, 11 & 12 or the soldiers and armor knights on turns 8 - 12. On Turn 13 the boss shows up. So basically the map still has turtle disincentives. In the midst of the swordmaster group the player has to deal with is a recruitable unit named Shiva. In order to recruit Shiva you have to talk to him with Safy who is near the bottom of the map. This is trickier than it sounds since you have to avoid killing Shiva while also managing to get Safy to where he’s at. It’s a good kind of tricky that forces the player to actually think and since Shiva is a worthwhile unit all the effort put into recruiting him will pay off.
Overall Rating: Pretty Good
________________________________________
Chapter 8

This is a really simple map. It has three things going for it:
- Marty. Marty McFly is back and you have to re-recruit him. It’s not a huge deal but it at least adds something to the map
- The thieves and hunters coming down the mountain side threatening the houses
- The gaiden chapter objective. In order to get to the next gaiden chapter you have to capture the boss without releasing him before he becomes a Wyvern Rider on Turn 16. This is easier said than done and it succeeds at making the map a little more challenging.
So yeah, it’s a small and simple chapter, but it succeeds at what it wants to accomplish.
Overall Rating: Decent
Chapter 8x

Here lies an underrated map. It has two routes at the beginning of the chapter that lead toward the boss and the player has to hurry up and save Dagdar and Tanya. Because of the fact that Dagdar can only cover one spot Tanya isn’t completely safe meaning that the player will have to play faster in order to save her. There’s also a thief who tries to get the treasures in the map too which further incentivizes the player to play faster. The treasures are worth getting which means that the effort taken to get them pays off. Gomez, the boss of the chapter, is really strong which adds an extra element of challenge to the map. My only nitpick is that the holy water treasure is placed weird, but it’s really not that big of a deal.
Overall Rating: Excellent
___________________________________________________
Chapter 9

This map is pretty interesting for an escape chapter. There’s a pretty direct route to the escape tile, but there are forest and mountain tiles which prevent make said route more difficult to travel. Then there’s the southern route toward the bishop, his armor knights and the wyverns. You’d think that nobody would ever choose this route but there are legitimate incentives to go down there. For one thing the bishop has a physic staff, a meteor and wind tome. Those are all some sweet goodies to obtain should the bishop happen to get captured. There’s a Stamina bag in the house by the bishop, which is an awesome item. The shop next to the house has purchasable stamina bags, which are expensive, but worth it.
The army in the south acts as a turtle disincentive. They will be traveling north toward Selphina’s group. If the player doesn’t arrive in time Selphina’s group will be overrun.
Overall Rating: Excellent
_________________________________________
Chapter 10

Welcome to “Ballista Land”, the greatest place to satisfy your urge to shoot something down with a ballista. It’s terrifying for everyone else, but hey that’s the point. “Ballista Land” offers differing choices in the routes one can take to approach the map. You can move north of the mountain to get the rescue staff. The northern route lets the player avoid most enemies, except for the ballista and the Bolting bishop. The middle route involves the most enemies. You have to destroy a large section of armor knights while being inside the range of potentially four different ballista. Then there’s the bottom route where there’s a village that gives the player a ward staff. It’s a bit difficult to get there due to the terrain and the fact that there’s a broken bridge that needs to be repaired. The payoff though is that this route has the least ballista that the player would have to deal with.
Both villages are threatened by thieves so the player will have to play faster in order to get to them. Both thieves have rapiers and stamina drinks so capturing them is worth it. The terrain and ballista make positioning incredibly important which is always a good thing for a strategy game.
Overall Rating: Excellent
_______________________________________
Chapter 11

I’ve never been the biggest fan of this map. There’s only one route to take and it’s through a narrow hallway. There’s a gaiden chapter and it’s requirement is that the player beat in less than 30 turns which is way too lenient. Heck you could easily beat this chapter in less than 20 turns.
Then there’s the ballista, which in my opinion negatively impact the map. If you don’t see the ballista coming they can feel like a cheap shot that came out of the blue. If you do see them coming they can act as a turtle incentive since you can take your sweet time preparing for them by killing off the armor knights and getting your army into place to prepare for them. Once they’re there they do count as a turtle disincentive since you’re going to want to get as far away from them as possible.
The torch staff you get as the treasure off to the side is worth it since the gaiden chapter is a fog of war map, but it’s a bit off to the side and the player has to go out of their way to get it. The boss of this map flees the next turn after you hit him, which is a bit of a disappointment.
Overall Rating: Below Average
______________________________________
Final Thoughts: From a map design perspective this is quite arguably the best section of the game. This section gives the player great map after great map. The escape chapters are wonderful and almost all of the chapters reviewed in this post are free of bs.
Thracia’s Map Rating Score So Far:
Excellent - 5
Pretty Good - 4
Decent - 3
Meh - 1
Below Average - 1
Fail - 0
Subscribe to:
Posts (Atom)