Wait a second. Is Grant saying that he likes playing a Conquest map?
Yep. I find Chapter 16 of Conquest to be a very fun map to play on. First of all, I’m a sucker for creative anti-turtle measures and this map definitely has one. The player starts the map with 10,000 gold and then loses 300 each round. That’s brilliant! There’s always going to be a sense of urgency because who wouldn’t want to have a lot of gold? I usually get around 9,000 gold whenever I beat this map.
This map also does a great job at throwing a variety of enemies at you, which is something I’ve always appreciated. You have Mercs, Berserkers, Sorcerers, Bow Users, etc. This requires the player to diversify their army in order to beat the map. What’s even better is that these enemies also use a creative variety of weapons. Wyrmslayer. Armorslayer. Bows. There’s bound to be a weapon that will deal effective damage against at least one of your units so you also have to pay attention to you’re fighting and what they’re carrying. As if that weren’t enough, this map also contains clever positioning of status staves so your every move really counts.

Then comes the most meaningful choice in Fates: Shura or Boots. And in the most hilarious way possible, the Boots wind up being the more meaningful choice. This map is the gift that keeps on giving. It’s extremely creative in its design from start to finish and it never stops being fun for the player.
____________________________________________________
# 6 - Conquest Chapter 8
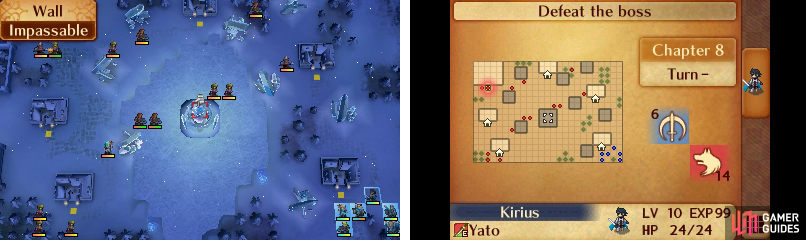
This map feels like a fast paced roller-coaster from start to finish. The player must traverse a lake in order to beat down a boss with Nosferatu on the other side of the map. This map also has a creative means of encouraging the player to play faster: The villages. Visit 3 villages by the end of the map and you get a whopping 10,000 gold. 10,000 gold is significant. You want that money. The map gives the player a “freebie” village and then you’ve gotta earn the other two.
The map also gives the player different paths to approach, which is always a plus. Then there’s the Dragon Vein. This map gets my vote for having the best use of Dragon Vein. Here you can either freeze the lake over, giving yourself passage to the other side, or you can unfreeze the lake and prevent enemies from ever reaching you. This gives the player options and forces the player to weigh said options when thinking about how to approach the throne.

The enemies in this map are simple, but effective in their design. Sorcerers and Fighters hit really hard and in this game they have an accuracy that can be taken seriously.
Flora’s status staff also adds to the level as it slows the player down. She also causes the player to think twice about their positioning. Flora’s stronger than the average enemy on this map so you’re going to need an over-leveled Corrin to wreck her. The last element of this map that I enjoy is the boss: He’s a mage with Nosferatu. You definitely have to think twice about how to approach the boss because simply charging forward guns a-blazing will get you killed while the boss is at near full HP. There’s also the fact that it’s a two range weapon which means that you’ll have to watch your step.
All-in-all it’s a fun, fast paced map.
_____________________________________________________
# 5 - New Mystery of the Emblem Chapter 22

This map for me is the epitome of "play fast or die". From the first turn onward enemy reinforcements show up behind you...and they don't let up. Enemy reinforcements will continue to add up and pile on until either you win or you die. The map is mean by placing treasures off to the side. Both of the treasures are dragon killing weapons, which are extremely useful at this part of the game. But doing so usually gets you killed.
This map has carefully placed mages with ballistic siege tomes that will make life miserable for you if you're not careful. All the Dragons and Berserkers can hit HARD too so you have to be extra careful. There are two entrances to the throne and no matter which one you take you pretty much have to charge in "guns a-blazing" because otherwise they're going to kill you.
All the while more and more enemies will show up behind you and will chase you at a relentless pace. The map feels like a giant obstacle course where the price of failure IS DEATH! And I will always love this map for it.
______________________________________________________
# 4 - Binding Blade Chapter 10B / 11A

These maps are wonderfully chaotic in the best possible way. The reason why I'm listing these two is because they play the exact same way. So let's take a look at all the wonderful side objectives that these maps provide:

The map also gives the player different paths to approach, which is always a plus. Then there’s the Dragon Vein. This map gets my vote for having the best use of Dragon Vein. Here you can either freeze the lake over, giving yourself passage to the other side, or you can unfreeze the lake and prevent enemies from ever reaching you. This gives the player options and forces the player to weigh said options when thinking about how to approach the throne.
The enemies in this map are simple, but effective in their design. Sorcerers and Fighters hit really hard and in this game they have an accuracy that can be taken seriously.
Flora’s status staff also adds to the level as it slows the player down. She also causes the player to think twice about their positioning. Flora’s stronger than the average enemy on this map so you’re going to need an over-leveled Corrin to wreck her. The last element of this map that I enjoy is the boss: He’s a mage with Nosferatu. You definitely have to think twice about how to approach the boss because simply charging forward guns a-blazing will get you killed while the boss is at near full HP. There’s also the fact that it’s a two range weapon which means that you’ll have to watch your step.
All-in-all it’s a fun, fast paced map.
_____________________________________________________
# 5 - New Mystery of the Emblem Chapter 22
This map for me is the epitome of "play fast or die". From the first turn onward enemy reinforcements show up behind you...and they don't let up. Enemy reinforcements will continue to add up and pile on until either you win or you die. The map is mean by placing treasures off to the side. Both of the treasures are dragon killing weapons, which are extremely useful at this part of the game. But doing so usually gets you killed.
This map has carefully placed mages with ballistic siege tomes that will make life miserable for you if you're not careful. All the Dragons and Berserkers can hit HARD too so you have to be extra careful. There are two entrances to the throne and no matter which one you take you pretty much have to charge in "guns a-blazing" because otherwise they're going to kill you.
All the while more and more enemies will show up behind you and will chase you at a relentless pace. The map feels like a giant obstacle course where the price of failure IS DEATH! And I will always love this map for it.
______________________________________________________
# 4 - Binding Blade Chapter 10B / 11A
These maps are wonderfully chaotic in the best possible way. The reason why I'm listing these two is because they play the exact same way. So let's take a look at all the wonderful side objectives that these maps provide:
- Recruiting Echidna, Klein and Tate
- Rescuing multiple villages
- Obtaining several promotion items
This map will keep you busy in the best possible way. Recruiting Klein and Tate is a little tricky. What's even more tricky? Trying to recruit them without killing a single member of their respective armies. That requirement is the epitome of "frustrating, but in a good way." The reward for keeping their NPC armies alive is that you get a promotion item. One of them is an Elysian Whip, which you can use to promote Miledy. The other one is an Orion Bolt, which can either promote Shin or provide a lot of money.
The villages will also be threatened too, so if you didn't get the message PLAY FAST! According to the wiki the villages net you "Visit 8 villages for Restore, Dragonshield, 5000G, Speedwing, Orion's Bolt, Sleep, Axereaver, and an Angelic Robe". So yeah, there's a lot of valuable stuff. Definitely worth saving if you ask me. Bytheway, if you save all the villages you'll get a Hero Crest. It's as if these maps are going overkill in rewarding the player. I like overkill.
In both maps Echidna will also be threatened by enemies. As if we didn't already get the memo it's blatantly clear that if you want all of the wonderful goodies you're going to have to earn them....and I freaking love it. I wish more Fire Emblem maps would require the player to be this busy. It keeps you engaged because there's never a dull moment and there's an immense feeling of satisfaction that comes from getting everything because you know that you earned it.
No comments:
Post a Comment