Sunday, March 27, 2022

Berwick Saga Map Design Review Part 2

 Chapter 1 - 1: Cruel Brothers


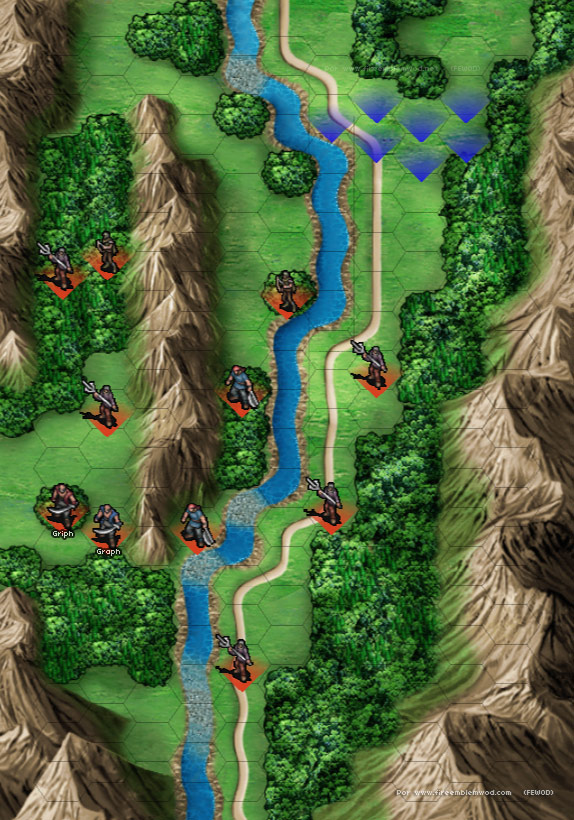
Here we have the first gaiden chapter in Berwick Saga and it's kinda bleh. This map is a kill / capture boss map. You basically move down the map and kill every enemy in your way. There are no turtle disincentives, and the closest thing to a side objective that happens is an enemy that drops a small amount gold near the bottom of the map. What's also sad is that there really isn't a reason to go to the left side of the map. The enemies don't drop anything, and it actually takes longer to reach the boss if you head down the left side. 

Speaking of the bosses, there are two bosses: Griph and Graph. If you attack Griph, a cutscene occurs where an archer named Sylvis cripples him and leaves. The map ends when this happens. Graph is tough to fight, but he drops money and an item that you can use for forging. My recommendation is to kill Graph first, and then fight Griph. 

Conclusion: I think this map would have benefitted from having more going on. A turtle disincentive and a more compelling reason to take the left route would have worked wonders for this map. 

Final Rating: Meh 

_______________________________________________

Chapter 1 - 2: The Young Knights


Here we have the first fog of war map in the game, and it's actually rather creative. Berwick Saga changes fog of war so that enemy vision is just as limited as the player's vision. This makes fog of war maps fair and interesting. This particular fog of war map begins with the player only controlling two characters: Ruby and Arthur. Ruby is your stereotypical underleveled character that veterans of the series dislike, while players who enjoy leveling up weak characters love. Her accuracy and damage output here sucks. Arthur is a decent unit who can hold his own. You spend a couple of turns with these two before the rest of your army shows up.

This map does a couple of interesting things that kind of act as a tutorial of sorts. The boss you need to kill for this map has a Berserk orb. There's an injured enemy that shows up halfway between the player and the boss that drops an item that cures the berserk status. Despite this map being fog of war, it's actually pretty easy to find this enemy and capture him before he runs away. 

There's another enemy who's looking to give the boss a powerful weapon that will let him 2 hit KO your troops. Once again, you need to play fast in order to prevent this enemy from giving the boss that  weapon. Before I forget, there are also enemy reinforcements that show up behind the player by a certain turn. This further succeeds at getting the player to play faster.

Overall: This map works as a brilliant tutorial for how both fog of war and the berserk status work in this game. It also does a pretty good job at getting the player to play faster. 

Final Rating: Excellent

_____________________________________

Chapter 2: Bandit Suppression


Here we finally get to the second main chapter of the game, and boy is there a lot to do! I'll start by listing all the side objectives in this map:
  • Defeat Kerusa (an optional enemy) and obtain the Crystal Ring.
  • Defeat or capture Harrington (an optional boss).
  • Visit the house near starting point, then visit another house near the boss. A fight ensues and after winning you will retrieve a Medicine Grass bundle.
  • On turn 12 a very dangerous enemy swordfighter, Zacharias, will appear in one of the northern caves. He has pretty high stats for this part of the game and will two shot your units. Running is an option, but capturing him does reward the player with an accessory.
  • On turn 16, Fabian appears near the river on the bottom left with a droppable treasure item (5.000 gold) and 2 very rare knives.
  • On turn 18, Talivan appears with a droppable Power Brace in the south forest. Since turn 18 is the last turn for the max mission rank, he must be killed in one turn if the player is going for that.
  • If Czene talks to Reese, a gaiden chapter is unlocked.

As you can see, the list of side objectives for this map is HUGE! It's easily the best part of this map. This is pretty indicative for how a lot chapters in Berwick Saga play: You have a simple main objective compounded by numerous side objectives. The side objectives are usually very interesting, and make the maps fun. This map is a prime example of doing that. 

This map will also introduce you to three new characters: Faye, Kramer, and Czene. Faye is a fragile myrmidon who is the only character in the game that can eventually learn Astra. She's also necessary for recruiting Faramir, who is one of the best units in the game. Kramer is a mercenary that has Arrowbane, a skill that gives him a 67 % chance to dodge arrows. This is a super important skill, because enemy bow users and ballista are really scary in the late game. He also can knock enemy shields away and is the only unit that doesn't suffer avoid penalties when climbing cliffs. Czene is a thief that can search invisible enemies, can hide in specific terrain, and can open doors and chests. She also gets a horse upon promotion. 

In terms of turtle disincentives, the map has to be beaten in 24 turns, which is generous but given all the side objectives that you can do in this game will come faster than you think. There's also an injured enemy that you can capture, who is far enough away from the player that you do have to hustle to get him and his loot. 

Two more noteworthy things to bring up
  • There's an annoying Bow Knight named Pizarro who will perform hit and run tactics near the river. There are some fun strategies to take him down, but he is nonetheless an obstacle to be dealt with.
  • To quote that same reddit page again: "A named enemy (Zaaro) near's Faye group is carrying a Sword Breaker dagger. As the name implies, it has a 33% chance of instantly breaking swords on hit, including the personal one Faye starts with. This is some Thracia 776 level trolling."
 (Source: https://www.reddit.com/r/fireemblem/comments/3fx2d8/berwick_saga_map_design_thread_chapter_2/)

Overall: This map has a lot of side objectives. It ends up making the level extremely fun to play. There's always something for everyone to do. You'll have to make use of everyone in your army, and figure out how to cover multiple fronts. 

Final Rating: Excellent


Berwick Saga's Map Design Tally So Far
  • Excellent: 3
  • Pretty Good: 0
  • Decent: 0 

  • Meh: 1 
  • Below Average: 0
  • Fail: 0

Saturday, March 26, 2022

Berwick Saga Map Design Review Part 1: Analyzing The First Chapter of the Game

 Yesterday I beat Berwick Saga for the second time. I think I have a good enough idea of how the game plays where I can start reviewing the map design. So here we go...


Chapter 1


Chapter 1 of Berwick Saga gets my vote for being the best designed first chapter of the Fire Emblem / Fire Emblem adjacent games. Instead of getting to play with only three units or less, you get a total of nine units to start out with. This increases the number of potential strategies and ways to play the game.

What separates this map from the other first chapters is that this map has two different turtle disincentives. The first comes from the fact that your healer Izerna and your fighter, Dean, start out at the opposite end of the map. Since Berwick Saga uses hexagons instead of squares for its grid, there are six potential spaces from which to attack someone at 1 range. This means that protecting your healer is significantly harder to do. If you want to keep your healer alive, you need to send some troops over to her fast. 
Fun fact, there's another route at the top of the map where you can send your troops around to get to your healer on the other side.

Another turtle disincentive comes in the form of two enemies that drop 1,000 gold each if they die. These enemies will try to run away from you, and will permanently leave the map if you let them. So that makes for two turtle disincentives on the first chapter of the game! That's incredible!


Near the start of the map is a tanky mini boss named Bernard that will be preventing you from moving toward the middle of the map. It takes a little bit of time to kill him and you'll definitely need Ward, the Jagen of the group, to finish him off. There's also a fun side objective near the boss in the form of a village with a question mark. Any unit who enters there will participate in a pre-scripted battle where your character will win, and they'll be rewarded with a neat little item. 


To finish off, I'd like to quote the Berwick Saga map design thread on reddit:

So, to recap. On the first freaking map of the game we have:
  • Multiple bosses.
  • Good map layout with 2 avenues of approach.
  • Good checkpoint abuse by the enemy forces.
  • 2 "timed" side objectives (one including recruitable characters) that use everything at a player's disposal.

Thank you based Kaga.


Berwick Saga's first chapter gets a 10 / 10. 

Rating: Excellent!

Sunday, March 6, 2022

Updated Holy War Randomizer Run

 I've always wanted to try a randomizer run. I decided to start with Holy War. There were a lot of different settings with which I could customize my character's class, Holy Blood, and skills. I'm about to finish Chapter 5 right now, and I wanted to show my team off. 


Aideen became a Falcon Knight, and was pretty powerful all around. I had a lot of fun having her wreck face all throughout the game. One funny note is that Dithorba's squad in Chapter 4 refused to attack her because her defense was so high that she wouldn't take any damage from them. They just flew around her and did nothing while Aideen skewered them all. It was hilarious!


Sigurd being a Bow Knight was a cool twist, because he was still strong, but he couldn't really solo the game. He had no enemy phase. Giving him Sol was interesting. One thing I can say about this Sigurd is that he was a tank. It was difficult for enemies to deal meaningful damage to him. The Bow Knights that attack you in Chapter 5 refused to attack him because they couldn't deal damage to him.


Having a Wyvern Knight was a fun addition to the first generation. Giving Midir Critical and Luna really made his combat shine. The only issues with him are his lack of resistance biting him in the butt when an enemy mage lands an attack, or his inability to double attack faster enemies at times (hence the presence of the Speed Ring). Overall, he was still really fun to use.


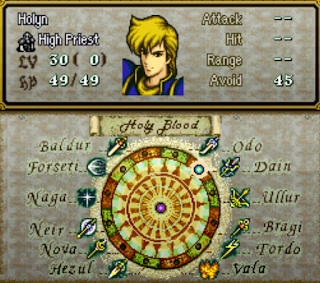
Holyn was essentially a charisma bot healer that rapidly gained a lot of experience. He was my go to healer for most of the run.


It was hilarious watching Claud one-shot many an enemy with a simple Elfire tome. I wish he had a little more avoid, since there were times where he died because the enemies managed to land a couple lucky hits on him.


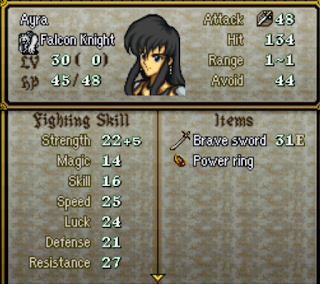
Ayra was pretty amazing! She's fast, powerful, and pretty durable. I included the kill count for her Brave Sword, because of how hilarious it was to watch her kill everything with it. Heck, I just had her fly up to Lex's dad, Duke Lombard, and she landed a crit on him like he was nothing. None of the Armored Knights with bows nor the ballista could hit her. Easily one of the strongest units in this randomizer run.


Master Knight Arden was a surprise to be sure, but a welcome one. He's another standout unit that killed anything I wanted him to kill. It was awesome giving him Forseti, only to see that Forseti got the Mystletainn's stat buffs. Forseti's still a strong weapon, but it's disappointing how much of a downgrade it is in comparison to its regular version. Once again, the dude's a total tank who just didn't care about taking damage.


Overall, I'm having fun with my Holy War randomizer run. There are only two complaints that I have:

1) Some weapons have awful hit rates:


Hit rates that low make a weapon unusable. Accuracy became the signature trait that I looked for when giving weapons to my team.

# 2) Holy Blood that didn't correspond to their weapon ranks:
Most of my group can't use the Holy Weapons that are linked to their Holy Blood. Even though I repaired the Tyrfing, I forgot about one simple fact: Nobody on my team could use it! So I had to sell it, which made me sad. Oh well.

Saturday, March 5, 2022

My Response to Medo


           So Medo and Scylla decided to make a Google doc detailing all of their problems with Fire Emblem 4: Genealogy of the Holy War. You can read the Google doc here: 

https://docs.google.com/document/d/13XajMOgGnKrFGAjhrGwqaUCd2zaaazK07VFw2JJhyGk/edit?fbclid=IwAR1Ku8T4zM-mty3dml9hKCxz8FxD3etJjxA7dDXF1qcV1spoWaUbel02Mpo


Medo literally tagged me and asked what my thoughts were of his Google doc. This is what prompted me to write this blog post. There are two major problems that I have with Medo’s Google doc:


  1. Medo has only played a tiny portion of Holy War: Before writing this post, I asked Medo if he had beaten the Second Generation. He told me that he gave up on Chapter 4. This is a really bad look because this means that he’s only played about forty percent of the game (and that's assuming that he actually beat Chapter 4). If you’re going to criticize a game, you should at least play the whole game from start to finish. I may hate Fates, but at least I can say that I’ve beaten all 3 Fates titles from start to finish. This gets even worse when Medo tries to criticize parts of the game that happened after he stopped playing.  


  1. Medo either misrepresents what actually happens in the game or his criticisms are founded on a misunderstanding of what happened in the game.


Final Note: The Google doc is so long that I'm going to have to break my response posts down and tackle certain points one piece at a time. I'm also going out of order because I have stronger disagreements with his points than others. I'm going to start with some of my biggest disagreements, which are:

1) His misrepresentation of Cuan and Ethlyn's deaths at the Yied / Aed Desert.
2) His misrepresentation of how Holy War portrays Travant.

I'd also like to remind everybody that the reason why I am doing this is because Medo literally asked me what my thoughts of his Google doc are. He asked for this. I'm just simply giving my honest response.


My First Response: Medo misrepresents Cuan and Ethlyn's Deaths in the Yied Desert

The big one. The Aed massacre. I seriously hate this moment. Quan and Ethlyn are heading to reinforce Sigurd's army (through a desert on horses) and they get jumped by Travant. Oh and Ethlyn brought Altena who's a baby at this point with her. Dear God this was a train wreck. Ethlyn bringing her own daughter to a very dangerous situation WITHOUT telling Quan about it makes her look like a brain dead moron and also makes her beyond unlikeable. My guess is that IS didn't want the player to have access to Altena and the gae bolg too soon but they couldn't think of a reasonable way so they went "f it, we will turn Ethlyn into a idiot." I have seen some counter points about Ethlyn trying to run away with Altena and the maps are supposed to be country sized, but I have refutes to these points. 


Me: Medo completely misrepresents the ambush in the Yied / Aed Desert. There’s a lot to unpack here, and I’ll begin with relevant screen caps I took of Quan and Ethlyn’s conversation in Chapter 5 that pertain to Medo’s criticism:


Mind you, this isn’t the whole conversation, but it’s the portion of the conversation that’s relevant to this discussion. The idea that Ethlyn brought Altenna to the battlefield without telling Cuan is objectively false. Cuan knew about Altenna’s presence, as indicated by the dialogue here.


The second point is that the dialogue indicates that Cuan and Ethlyn had been marching in their own lands and that Cuan had made Ethlyn promise to go back once they were heading in enemy territory. Ethlyn had no intention of fighting when Altenna was on her lap.


Refute A. I don't understand the map being country size changes everything. Ethlyn still brought her own child to a very dangerous situation WITHOUT telling her own husband. The maps could be planet size or small town size and the problem wouldn't go away. 


This needs context. Around a couple of weeks ago, Austin made a poll about who the better mother was: Ethlyn or Elena. Medo rehashed the same tired, talking point and both Austin and I refuted it. Austin brought up the point that the maps in Holy War were supposed to be the size of countries. The point that he was making was that Cuan and Ethlyn were days away from the battlefield.


This is the same point that I brought up, and will bring up again in response to Medo:

Cuan and Ethlyn were far enough away from the battlefield to where they wouldn’t be in any danger yet, and Ethlyn had plenty of time to turn back around and go home to Leonster. If Travant hadn’t ambushed them, she could have marched back to Leonster safe and sound. That’s the point of the map size. Ethlyn was far enough away from the battlefield that she could have marched home without being in any danger. The situation was not as dangerous as Medo keeps harping on about.


Refute B. Because they knew they were sent as reinforcements, Ethlyn should have known combat was going to be involved at some point.


Ethlyn knew that combat was going to be involved. She just didn’t believe that it would happen as soon as it did. Both Cuan and Ethlyn were operating under the assumption that she would have enough time to march back to Leonster before the fighting commenced. Cuan even tells her that they’re about to enter enemy territory. 


Another minor nitpick here: They didn’t “know” that they were sent as reinforcements. The choice to reinforce Sigurd was of their own volition. Sigurd had no idea that they were on their way to reinforce him. Medo saying that “they knew they were sent as reinforcements” implies that Sigurd called for aid, and that’s why they’re there. This isn’t what happened in the game so I’m claiming this as Medo misrepresenting Holy War.


 Meaning that she would have taken Altena back to Lionster after taking her to a very dangerous situation. She couldn't have said  "Altena sweetie, Mommy and Daddy will be heading to an army to help it. Finn will take care of you, your brother, and Nana. Take care." 


What was so wrong with that?


What dangerous situation? Cuan and Ethlyn were far away from the battlefield. If Travant hadn’t ambushed them, there would have been no danger.


 Bytheway, your hypothetical is a straw man. Ethlyn had no intention of “heading to an army to help it.” Cuan did, but Ethlyn at most wanted to say hello again to Sigurd and Cuan who were about to take on the Grannvale armies. Ethlyn even mentions how scared she is of fighting Grannvale because of how monstrously powerful that country is. For all she knew, Cuan and Sigurd wouldn’t return back from war. 


Refute C. Even the idea that Travant jumping them is hard to believe because both Lionster and Thracia were established to be on bad terms back in the prologue. And Ethlyn is basically the queen of Lionster. HOW DID SHE NOT SEE THIS COMING!?


I had a difficult time understanding what Medo was saying before, but I think what he means is this:


“It’s difficult for me to believe that Cuan and Ethlyn couldn’t possibly foresee Travant ambushing them since their countries are supposed to be enemies.”


^ If Medo means something different than this, please let me know.


In the meantime, I don’t really see why it’s that difficult for Cuan and Ethlyn to be surprised by Travant’s ambush. There are two different times prior to Chapter 5 where Cuan and Ethlyn have to march lengthy distances throughout Jugdral. The first time is in the prologue, where Cuan, Ethlyn, and Finn march from Leonster to Chalphy to aid Sigurd. The second time is during the beginning of Chapter 4 where Cuan, Ethlyn, and Finn march from Silesse to Manster. In neither circumstance do we ever hear them mention anything about being afraid of getting ambushed by Thracia. Why would they start now?


Another important detail is that Cuan assumed that Thracia would attack Leonster Castle, not him and his troops. He actually says this in the game too. So with that being said, it makes perfectly logical sense to see why Cuan and Ethlyn wouldn’t see Travant’s ambush coming. Also, why does Medo jump on Ethlyn’s case for not seeing the ambush coming, but not Cuan? He was the one who made the tactical error. It was his decision to assume that Travant would aim for the castle, and not for his troops. It seems strange to go after Ethlyn, but not also Cuan.


Why didn't Quan or Ethlyn bring any Wyvern killing weapons and went around the desert as a "just in case Travant or anyone from Thracia tried to ambush us?" 


In order to understand how dumb this argument about going around the desert is, we need to look at a map of Jugdral:


Cuan knew that Sigurd was marching through the Yied Desert. His plan was to rendezvous with him. The only way for Cuan’s troops to do that is to march through the Yied Desert and meet up with Sigurd. Now I ask you, how else are Cuan and Ethlyn supposed to meet up with Sigurd’s army? The only other ways to do it would either be to fly toward him or to make an armada of ships and sail all across Jugdral. Flying towards Sigurd would be impossible since Cuan doesn’t have access to wyverns. Sailing via ships would take significantly longer than to march through the desert, and Travant would still be able to ambush him. In fact, an ambush via boat would be even easier than in the desert.  


If you try to argue that he should march straight into Grannvale, then that’s not likely to work either since they’re marching straight into enemy territory without meeting up with Sigurd first. No matter how you look at it, Cuan and Ethlyn’s only option is to march through the desert. 


As to why they don’t bring anti-wyvern weapons: They didn’t expect to get ambushed by Travant. They assumed that he would attack Leonster Castle. This is explained in the story itself.


Travant is another case of an unintentionally unsympathetic character. He's meant to be a well meaning terrorist and he's doing the evil for his nation but other than that, (and even then we only know about this in the manga and Thracia 776) 


  1. The idea that only Thracia 776 and the manga portray Travant as doing bad things for the betterment of his nation is objectively false. There’s a conversation that occurs between Travant and Arion in Chapter 8 of Holy War where Travant says the following:


Trabant

“Everything rests on the unification of the peninsula. The fertile lands to the north hold the key to eliminating poverty within our kingdom. Areone, our ways have often been likened to that of hyenas… Yet our mercenary work for foreign lands has meant the kingdom’s survival. However… I’ve had enough. It’s time we move up in this world. Areone, the rivalry before us will determine the fate of Thracia.”


(Source: https://serenesforest.net/genealogy-of-the-holy-war/scripts/script-translation/chapter-8-dragon-knights-of-thracia/


This conversation happens right at the beginning of Chapter 8, so you can’t miss it. The only reason why Medo doesn’t take this conversation into account is because he hasn’t actually played that part of the game. (He also probably didn’t see this conversation happening on a YouTube video either) This makes me wonder why he bothered to criticize how the game portrays Travant since the majority of Travant’s appearances in the story happen after Chapter 4.

Anyone in the fandom who is a fan of Travant’s character views him as a character who tried to achieve noble goals through villainous means, which tells me that the game absolutely succeeded in its portrayal of his character. 


the game exclusively paints him as a complete monster who does terrible crime after terrible crime on top of terrible crime. This makes him look more like an irredeemable warlord which if the game wasn't trying to make you feel sorry for him, could have worked. 


Citation needed. Medo never provides a single example of the “terrible crime on top of terrible crime” that Travant supposedly commits over the course of the game’s story. He also never provides any examples of how the game makes him look “like an irredeemable warlord.” 


He also misrepresents the game by mentioning that the game is “trying to make you feel sorry for him.” While Travant’s motives are noble, I don’t think it’s fair to say that Holy War “wants you to feel sorry for him.” We know that what he does isn’t ethical, but we get why he makes the choices that he does. The game portrays him as a well intentioned extremist who will do whatever it takes to advance his country’s interests. It clearly succeeded in that case.