Chapter 1 - 1: Cruel Brothers
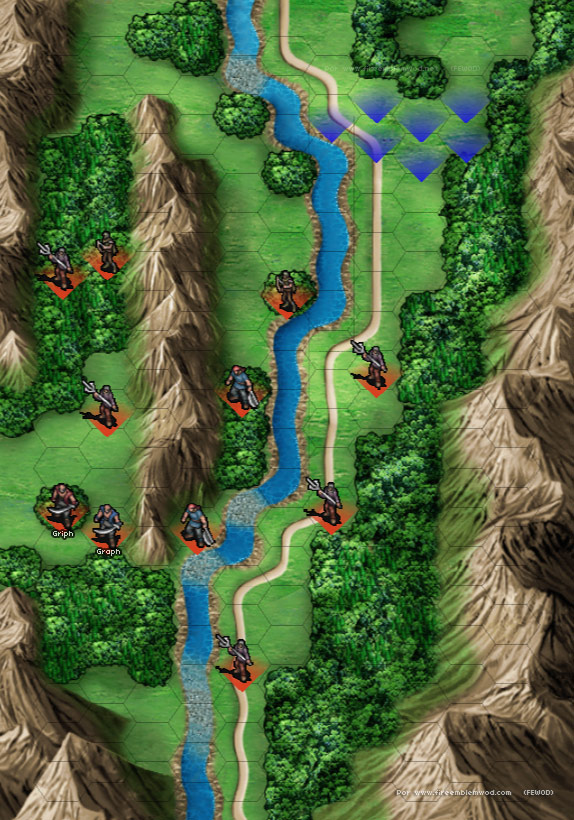
Here we have the first gaiden chapter in Berwick Saga and it's kinda bleh. This map is a kill / capture boss map. You basically move down the map and kill every enemy in your way. There are no turtle disincentives, and the closest thing to a side objective that happens is an enemy that drops a small amount gold near the bottom of the map. What's also sad is that there really isn't a reason to go to the left side of the map. The enemies don't drop anything, and it actually takes longer to reach the boss if you head down the left side.
Speaking of the bosses, there are two bosses: Griph and Graph. If you attack Griph, a cutscene occurs where an archer named Sylvis cripples him and leaves. The map ends when this happens. Graph is tough to fight, but he drops money and an item that you can use for forging. My recommendation is to kill Graph first, and then fight Griph.
Conclusion: I think this map would have benefitted from having more going on. A turtle disincentive and a more compelling reason to take the left route would have worked wonders for this map.
Final Rating: Meh
_______________________________________________
Chapter 1 - 2: The Young Knights

Here we have the first fog of war map in the game, and it's actually rather creative. Berwick Saga changes fog of war so that enemy vision is just as limited as the player's vision. This makes fog of war maps fair and interesting. This particular fog of war map begins with the player only controlling two characters: Ruby and Arthur. Ruby is your stereotypical underleveled character that veterans of the series dislike, while players who enjoy leveling up weak characters love. Her accuracy and damage output here sucks. Arthur is a decent unit who can hold his own. You spend a couple of turns with these two before the rest of your army shows up.
This map does a couple of interesting things that kind of act as a tutorial of sorts. The boss you need to kill for this map has a Berserk orb. There's an injured enemy that shows up halfway between the player and the boss that drops an item that cures the berserk status. Despite this map being fog of war, it's actually pretty easy to find this enemy and capture him before he runs away.
There's another enemy who's looking to give the boss a powerful weapon that will let him 2 hit KO your troops. Once again, you need to play fast in order to prevent this enemy from giving the boss that weapon. Before I forget, there are also enemy reinforcements that show up behind the player by a certain turn. This further succeeds at getting the player to play faster.
Overall: This map works as a brilliant tutorial for how both fog of war and the berserk status work in this game. It also does a pretty good job at getting the player to play faster.
Final Rating: Excellent
_____________________________________
Chapter 2: Bandit Suppression

Here we finally get to the second main chapter of the game, and boy is there a lot to do! I'll start by listing all the side objectives in this map:
- Defeat Kerusa (an optional enemy) and obtain the Crystal Ring.
- Defeat or capture Harrington (an optional boss).
- Visit the house near starting point, then visit another house near the boss. A fight ensues and after winning you will retrieve a Medicine Grass bundle.
- On turn 12 a very dangerous enemy swordfighter, Zacharias, will appear in one of the northern caves. He has pretty high stats for this part of the game and will two shot your units. Running is an option, but capturing him does reward the player with an accessory.
- On turn 16, Fabian appears near the river on the bottom left with a droppable treasure item (5.000 gold) and 2 very rare knives.
- On turn 18, Talivan appears with a droppable Power Brace in the south forest. Since turn 18 is the last turn for the max mission rank, he must be killed in one turn if the player is going for that.
- If Czene talks to Reese, a gaiden chapter is unlocked.
Source: https://www.reddit.com/r/fireemblem/comments/3fx2d8/berwick_saga_map_design_thread_chapter_2/
As you can see, the list of side objectives for this map is HUGE! It's easily the best part of this map. This is pretty indicative for how a lot chapters in Berwick Saga play: You have a simple main objective compounded by numerous side objectives. The side objectives are usually very interesting, and make the maps fun. This map is a prime example of doing that.
This map will also introduce you to three new characters: Faye, Kramer, and Czene. Faye is a fragile myrmidon who is the only character in the game that can eventually learn Astra. She's also necessary for recruiting Faramir, who is one of the best units in the game. Kramer is a mercenary that has Arrowbane, a skill that gives him a 67 % chance to dodge arrows. This is a super important skill, because enemy bow users and ballista are really scary in the late game. He also can knock enemy shields away and is the only unit that doesn't suffer avoid penalties when climbing cliffs. Czene is a thief that can search invisible enemies, can hide in specific terrain, and can open doors and chests. She also gets a horse upon promotion.
In terms of turtle disincentives, the map has to be beaten in 24 turns, which is generous but given all the side objectives that you can do in this game will come faster than you think. There's also an injured enemy that you can capture, who is far enough away from the player that you do have to hustle to get him and his loot.
Two more noteworthy things to bring up
- There's an annoying Bow Knight named Pizarro who will perform hit and run tactics near the river. There are some fun strategies to take him down, but he is nonetheless an obstacle to be dealt with.
- To quote that same reddit page again: "A named enemy (Zaaro) near's Faye group is carrying a Sword Breaker dagger. As the name implies, it has a 33% chance of instantly breaking swords on hit, including the personal one Faye starts with. This is some Thracia 776 level trolling."
Overall: This map has a lot of side objectives. It ends up making the level extremely fun to play. There's always something for everyone to do. You'll have to make use of everyone in your army, and figure out how to cover multiple fronts.
Final Rating: Excellent
Berwick Saga's Map Design Tally So Far
- Excellent: 3
- Pretty Good: 0
- Decent: 0
- Meh: 1
- Below Average: 0
- Fail: 0
No comments:
Post a Comment