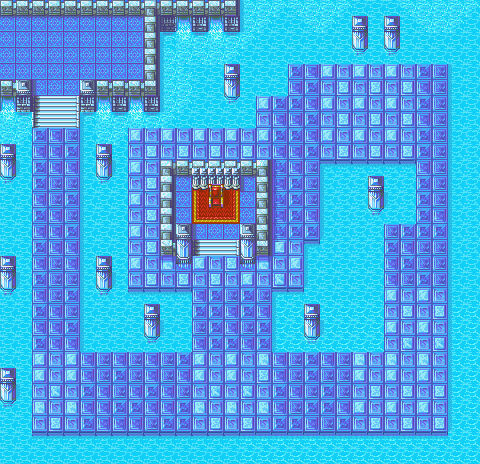
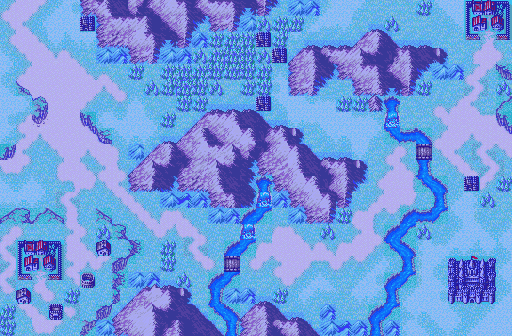
Chapter 14x, aka "the Warpskip Gaiden". This is a map that I traditionally have used Warp on. Even Fire Emblem Wiki tells you to Warp Skip this map:
"If you have a magic users with high Magic and an A/S rank in staves, using the Warp staff given to you in the last chapter, it is possible to one turn this map by warping one unit and Roy into the throne room and have the other unit (or if you warped Lalum or Elphin, use Roy) to kill the boss, then have Roy seize the throne. If you are using one magic user, use Lalum/Elphin to dance for the magic user."

I don't give maps a lower rank because of Warp. The Warp staff is so broken that it can break a lot of maps across the series. I didn't hold Warp Skip against Thracia 776 back when I did my Map Design Analysis for that game, so I'm not going to take Warpskip into account for this map.
I decided to play this map without Warp Skipping just to see what it was like. I am never making that mistake again. Chapter 14x is more fun to play when you skip the map than when you actually attempt it in a normal way, which is really sad. The water gimmick is not fun since all it does is make anyone who isn't a flier incapable of moving. This is even worse than the desert gimmick! This map has no turtle disincentives, and there are enemies in the distant corners that don't do anything. You can essentially beat this map without Warp and still not interact with a decent chunk of the enemies. I fail to see any redeeming qualities to this map, which means that Chapter 14x gets the ranking of:
Chapter 14x Ranking: Fail!
____________________________________________
Chapter 15
This map kind of reminds me of Chapter 5 in the sense that there's a lengthy mountain range between the player and the boss. There's also a route that the player would otherwise have to move around that can feel like a bit of a slog to play through.
This map tries to get the player to play faster by having a Brigand threaten the village to the right, but the village is pretty close to the player, and since the enemies on this map aren't that challenging it isn't difficult to get to said village. Perceval's recruitment isn't anything special and doesn't add much to the map.
Once the village is rescued there's not much to do except either move around the mountain or have a flier swoop in to kill the boss. Overall, this is a pretty boring chapter.
Chapter 15 Ranking: Below Average.
____________________________________________
Chapter 16
This map is actually good. For starters, it gives the player two routes to approach the map with, and you have an actual reason to split your army up and head in both directions. On the right, you have Hugh's recruitment, plus treasure. On the left you have Zeiss in the upper left hand corner and treasure.
In order to get the next Gaiden chapter you need to keep Douglas alive. This sounds like a neat puzzle on paper, but in practice it can be easily solved with a Sleep staff. It also has enemy reinforcements that approach the player from behind. The only problem is that you can prevent these reinforcements from appearing by having a character move on these tiles. So the turtle disincentive can be easily undermined.
Overall, it's a fine map. It could have been better, but it works.
Chapter 16 Ranking: Decent
____________________________________________
Chapter 16x
I'm trying to think of something positive to say. Umm...I like the siege tomes and status staves that enemies throw at you. I guess you can say that there are two main methods of approaching enemies.
Yeah I got nothing. The only interesting aspect of this map are the ballistic siege tomes and status staves. Outside of that, it's a pretty bland map that has nothing new or interesting to offer.
Chapter 16x Ranking: Below Average
____________________________________________
Chapter 17 (Sacae Route)
This map...is okay? The most interesting part of this map is the village in the top right. Even though this is a Fog of War map, you can potentially still find out that there are thieves who will presumably go after said village. So, I guess there's still a turtle disincentive. Plus there are enemies who will show up from behind the player, so I guess that counts? Again, there's not much to this map since the path to the throne is fairly straightforward for a Fog of War map. Trying to get to the village is the most interesting part, but it isn't that difficult to get to.
Chapter 17 (Sacae Route): Meh
____________________________________________
____________________________________________
Chapter 19 (Sacae Route)
I'm kind of torn when it comes to this map. There's this weird design duality where this map somehow both encourages turtling and discourages it. This chapter begins with several waves of enemies coming at the player in addition to having a couple of enemies start out near the player. These enemies encourage turtling because they're so close to the player, and they're aggressive too. That being said, once those enemies are gone, the chapter will proceed to throw a bunch of enemy reinforcements at you from behind. These enemies in general do a good job at forcing the player to play faster. I will say that some enemies appear on houses potentially right next to the player, which can cause some resets. Overall though, I do think this map is a net positive in pressuring the player since it manages to provide numerous enemy reinforcements after the initial wave.
This map also provides two interesting methods of approach via the cracks in the wall. It's helpful for avoiding the main army. I do wish that the game told you that the front gate can't be opened via thieves or the Unlock staff. The last noteworthy aspect of this map is that the boss has absurd Speed. Gel has 27 Speed, which means that double attacking doesn't exist unless you're using a Brave Weapon. Plus Gel's Avoid is stupidly high which means that fighting him is an exercise in frustration.
With all this being said, this is so far the most interesting in the Sacae Route that I've played so far.
Chapter 19 Ranking: Decent
____________________________________________
Chapter 20 (Sacae Route)
This map is like a slightly better designed version of Chapter 16x. This map throws a lot of ballistic siege tomes and status staves at the player, which is probably the best part about it. The map provides a side objective in the form of treasure, but fails to threaten that treasure so the player has all the time in the world to get it. FE Wiki says that there are thieves that will try to get said treasure, but I never saw them and I play casually. This map would have been stronger if it tried to punish turtling harder.
Chapter 20 Ranking: Meh
_____________________________________________
Current Map Design Rankings So Far
Excellent: 4
Pretty Good: 4
Decent: 3
Meh: 6
Below Average: 4
Fail: 3
I'm trying to think of something positive to say. Umm...I like the siege tomes and status staves that enemies throw at you. I guess you can say that there are two main methods of approaching enemies.
Yeah I got nothing. The only interesting aspect of this map are the ballistic siege tomes and status staves. Outside of that, it's a pretty bland map that has nothing new or interesting to offer.
Chapter 16x Ranking: Below Average
____________________________________________
Chapter 17 (Sacae Route)
This map...is okay? The most interesting part of this map is the village in the top right. Even though this is a Fog of War map, you can potentially still find out that there are thieves who will presumably go after said village. So, I guess there's still a turtle disincentive. Plus there are enemies who will show up from behind the player, so I guess that counts? Again, there's not much to this map since the path to the throne is fairly straightforward for a Fog of War map. Trying to get to the village is the most interesting part, but it isn't that difficult to get to.
Chapter 17 (Sacae Route): Meh
____________________________________________
Chapter 18
Yeah, I'm not a fan of this map. It's basically an open field with a bunch of enemy spawn points near the throne. I get the idea behind this: You want the player to play fast so that there's less time for enemies to show up. However, the enemy reinforcements show up too close to the player in a game where same turn reinforcements exist. So basically it's really easy for an enemy to show up right next to the player and for that enemy to cause a Game Over. When people complain about same turn enemy reinforcements, they're probably thinking about this map. Outside of the spawn points, this map kind of feels like the map I'd see on Awakening or Gaiden / Echoes due to the open plain nature of the game.
Chapter 18 Ranking: Fail
____________________________________________
Chapter 19 (Sacae Route)
I'm kind of torn when it comes to this map. There's this weird design duality where this map somehow both encourages turtling and discourages it. This chapter begins with several waves of enemies coming at the player in addition to having a couple of enemies start out near the player. These enemies encourage turtling because they're so close to the player, and they're aggressive too. That being said, once those enemies are gone, the chapter will proceed to throw a bunch of enemy reinforcements at you from behind. These enemies in general do a good job at forcing the player to play faster. I will say that some enemies appear on houses potentially right next to the player, which can cause some resets. Overall though, I do think this map is a net positive in pressuring the player since it manages to provide numerous enemy reinforcements after the initial wave.
This map also provides two interesting methods of approach via the cracks in the wall. It's helpful for avoiding the main army. I do wish that the game told you that the front gate can't be opened via thieves or the Unlock staff. The last noteworthy aspect of this map is that the boss has absurd Speed. Gel has 27 Speed, which means that double attacking doesn't exist unless you're using a Brave Weapon. Plus Gel's Avoid is stupidly high which means that fighting him is an exercise in frustration.
With all this being said, this is so far the most interesting in the Sacae Route that I've played so far.
Chapter 19 Ranking: Decent
____________________________________________
Chapter 20 (Sacae Route)
This map is like a slightly better designed version of Chapter 16x. This map throws a lot of ballistic siege tomes and status staves at the player, which is probably the best part about it. The map provides a side objective in the form of treasure, but fails to threaten that treasure so the player has all the time in the world to get it. FE Wiki says that there are thieves that will try to get said treasure, but I never saw them and I play casually. This map would have been stronger if it tried to punish turtling harder.
Chapter 20 Ranking: Meh
_____________________________________________
Current Map Design Rankings So Far
Excellent: 4
Pretty Good: 4
Decent: 3
Meh: 6
Below Average: 4
Fail: 3
No comments:
Post a Comment