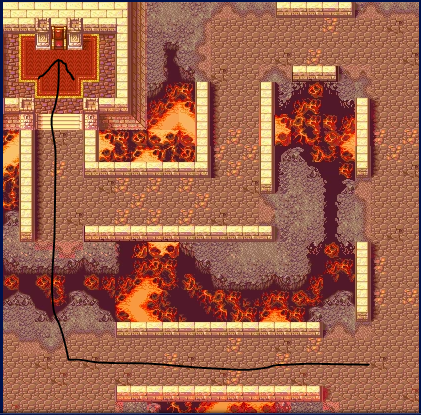
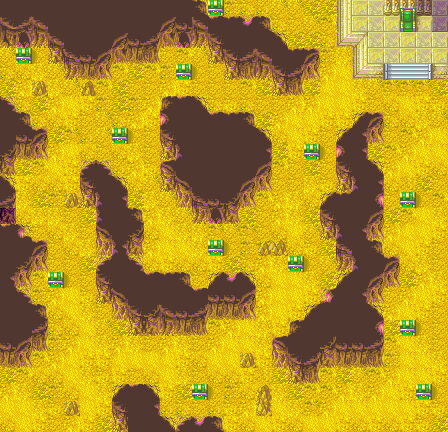
Not going to lie, I really don't like this map. My biggest problem is that whoever designed it didn't take into account the fact that the Rescue mechanic exists and that Thany / Shanna can para drop someone.
As the picture demonstrates, my main strategy for this map is to move to the right, have Thany / Shanna drop Rutger (who is usually promoted by this point) across the chasm, have Rutger kill every enemy on his way to the throne (including the boss) and then have Roy seize. This kind of makes the rest of the units for this chapter feel completely irrelevant.
Chapter 8x Ranking: Fail
____________________________________________
Chapter 9
Chapter 9 really doesn't do it for me. One problem I have with this map is that it has Fog of War. For those of you who don't know, I really don't like Fog of War. The idea of a mechanic actively hiding enemy unit placement contradicts the entire point of a strategy game like Fire Emblem. It feels kind of like an artificial way to make maps more challenging. The path forward is pretty uninteresting and thanks to Fog of War you can't even tell when the house to the bottom left is being threatened by brigands. The gimmick of picking a village determining your route is neat, but it doesn't really help the map out much.
Chapter 9 Ranking: Meh
________________________________________
Chapter 10A
I picked the A Route for this map design review. The plan right now is to play the game, review the A route (and the Sacae route) and then after I'm going through this playthrough to go back, play the game again and play the B route / Ilia Route.
As for this particular map: Like the previous map, this isn't anything to write home about. The direction of this map is pretty straightforward and uninteresting. The village to the right is closer to the player than to the brigands on the left so it's pretty easy to get to it before the enemy does. There's not much else to comment on, it's a pretty uninteresting map.
Chapter 10A Ranking: Meh
__________________________________________
Chapter 11A
Fun fact: I've fan gushed about this map before: https://thecrusadergrant.blogspot.com/2018/12/top-10-favorite-maps-to-play-on-part-2.html
Chapter 11A of Binding Blade is one of my all-time favorite maps to play in the series. I agree with everything I wrote in the previous post so I'm gonna copy / paste it here:
"These maps are wonderfully chaotic in the best possible way. The reason why I'm listing these two is because they play the exact same way. So let's take a look at all the wonderful side objectives that these maps provide:
- Recruiting Echidna, Klein and Tate
- Rescuing multiple villages
- Obtaining several promotion items
This map will keep you busy in the best possible way. Recruiting Klein and Tate is a little tricky. What's even more tricky? Trying to recruit them without killing a single member of their respective armies. That requirement is the epitome of "frustrating, but in a good way." The reward for keeping their NPC armies alive is that you get a promotion item. One of them is an Elysian Whip, which you can use to promote Miledy. The other one is an Orion Bolt, which can either promote Shin or provide a lot of money.

So yeah, there's a lot of valuable stuff. Definitely worth saving if you ask me. Bytheway, if you save all the villages you'll get a Hero Crest. It's as if these maps are going overkill in rewarding the player. I like overkill.
In both maps Echidna will also be threatened by enemies. As if we didn't already get the memo it's blatantly clear that if you want all of the wonderful goodies you're going to have to earn them....and I freaking love it. I wish more Fire Emblem maps would require the player to be this busy. It keeps you engaged because there's never a dull moment and there's an immense feeling of satisfaction that comes from getting everything because you know that you earned it."
In both maps Echidna will also be threatened by enemies. As if we didn't already get the memo it's blatantly clear that if you want all of the wonderful goodies you're going to have to earn them....and I freaking love it. I wish more Fire Emblem maps would require the player to be this busy. It keeps you engaged because there's never a dull moment and there's an immense feeling of satisfaction that comes from getting everything because you know that you earned it."
Chapter 11A Ranking: Excellent
___________________________________________
Chapter 12

During the previous post I mentioned how Chapter 8 had enemies use a more creative variety of weapons. This map takes that same concept and amplifies it to wonderful effect. In this map enemies have access to the following:
- Status Staves
- Longbows
- Silver Weapons
- Multiple 1 - 2 range weapons
- Long Range Ballistic Magic
The presence of these things makes the map much more interesting to play as it gives enemies the power to threaten the player. The archers with longbows can cause the player to think about where they're going to place their units throughout the winding halls. The status staves and Eclipse definitely make the player pay attention to where they're supposed to go. All of these weapon choices reinforce the importance of unit positioning.
This map provides treasures on both of its sides, which gives the player a legitimate incentive to split their army up and approach the map from different sides. Cath once again shows up and tries to threaten the treasure on the right, which works as a turtle disincentive. Raigh being on the left provides an extra incentive to approach the throne from the left.
This map also has enemy reinforcements that charge at the player from behind, forcing the player to play faster. Chapter 12 also has a Gaiden requirement. In order to unlock 12x you have to beat the map in 20 turns or less. For a Casual player that does make a difference, since it means that the player can't take all day getting treasure and killing enemies. Overall, this map has everything you could ask for when analyzing map design.
Chapter 12 Ranking: Excellent
__________________________________________
Chapter 12x
This map has more going for it than I gave it credit for. There are multiple thieves throughout the map who will either steal, or attempt to steal, the wide variety of treasures. This works as a means of getting the player to play faster. This map also provides the player with multiple routes with which to approach the throne. Given how well spread out all the treasures are, you do have an actual incentive to split your army up. Fog of War shows up again, and it encourages the player to play more cautiously since you don't know where enemies are. This map would have been better if you were able to see where you're going.
Chapter 12x Overall Ranking: Pretty Good
____________________________________________
Chapter 13
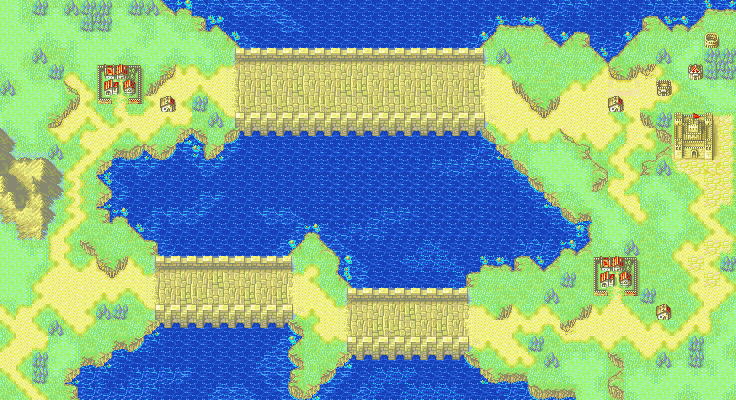
Having just played this map today, the first thing that stood out to me was the variety in enemy weapons. Killer Weapons, Silver Weapons, Reavers, 1 - 2 Range Weapons, etc.
Having enemy units with weapon variety like this makes them more interesting to deal with. This chapter also starts throwing out more promoted enemies like the Paladins and the Hero at the bottom left hand corner of the map. Having stronger enemies provides a legitimate challenge to the player without having to resort to b.s. (Take notes modern Fire Emblem. This is how you do challenge right)
Perceval's presence is interesting, as it's basically the game dangling a carrot in front of the player's face. But it's pretty hard to recruit Perceval in this chapter, so there's an element of risk-reward at play.
The enemy unit positioning is also interesting, because the Wyvern Riders in this chapter threaten the player in an interesting way. They can fly, and aren't hindered by the restrictive terrain of the bridges in the same way that the player is. Plus, these Wyvern Riders are tough enemies to beat so you have to be careful when dealing with them. One element I haven't brought up that works are the ballista. They require the player to pay attention to their unit's positioning, but if the player manages to take control of them, they can be used against the enemy Wyverns. That's actually a pretty ingenious way to incorporate ballista.
Unfortunately there is one problem I have with this map. Chapter 13 has a similar problem to the Ninja level in Conquest. Both maps provide turtle disincentives, but they also undermine those turtle disincentives with their terrain. You see, it's very easy to have two durable units sit the choke-point in the bridge and hold off the enemy horde. I speak from experience here, because I just did a few hours ago with this map and I also did that with Conquest Chapter 17. So I do have to dock this map a rank for undermining its own turtle disincentive.
Chapter 13 Ranking: Pretty Good
_________________________________________
Chapter 14
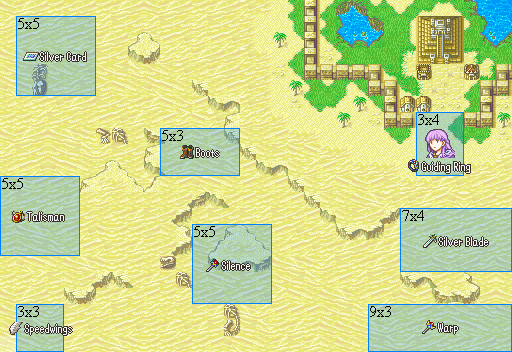
Oh boy. It's this map. Chapter 14 happens to have two gimmicks that I'm not a fan of. The first gimmick is Fog of War. The second gimmick is the desert gimmick. I'm not a fan of most desert maps because they're a slog to play through for any unit that isn't a mage or a flier. Combine those gimmicks together and you get a very unpleasant experience. What's worse is that this map has multiple Wyvern Riders that can fly from seemingly out of nowhere, and can wreck you. It also doesn't help that there are multiple Manaketes that you have to deal with too.
The only thing this map does well is apply pressure on the player. Not only does this map provide numerous enemy brigands that can swarm behind you, it also has a Gaiden chapter that comes right after it. In order to get to that Chapter you have to complete this map in less than 25 turns, which matters to those of us who aren't doing ltc runs.
The turtle disincentives are good enough to prevent this map from getting the rank of "Fail", but unfortunately that's the only thing this map gets right. I'm also not a fan of the two units you're given here. Sophia is notorious for how bad she is, and Cecilia is on a horse so her movement is very limited. At least this map gives you some sweet loot.
Chapter 14 Ranking: Below Average
hi
ReplyDeletenice blog, i wanna write someone like this
ReplyDeleteThank you.
Delete