Chapter 18
Not going to lie, I actually like this level. For starters there are two routes to approach the chapter from and it seems like there’s a pretty decent incentive for the player to go both routes and split their army up. The map also features a decent variety of different enemy unit types. There are cavalry (both Paladins and Bow Knights), Heroes, status staff maids, armor knights and sorcerers. That’s enough variety to require the player to switch things up a little bit. The player has to deal with 3 bosses who are on different sides of the room. Two enemy generals are paired up and they both have Wary Fighter, which makes them even more difficult to deal with (although effective weaponry exists).
There are a couple of nitpicks that I have. The turn limit is a bit generous, Zola isn’t all that strong and the treasure chests are never contested. I am willing to cut some slack for this map when it comes to the turn limit though. This map is supposed to be a breather before plunging into the nightmare of the next few chapters. At least this map tried to get the player to play somewhat faster, which is more than what I can say for Chapter 11.
Overall Rating: Pretty Good

Chapter 19
Oh great. The infamous furry genocide chapter. Reviewing this should be fun (in case it’s not obvious I’m being sarcastic). This map has several issues that completely undermine it:
- Homogeneous Enemy Unit Type: As you may have noticed in my Chapter 18 review and in a couple of other map reviews I mention diversity of enemy unit types as a good thing. Want to know why I bring that up? Because 1 - 2 enemy unit types generally makes the map significantly easier.
Every Fire Emblem game has weapons that deal effective damage against certain types of units so if a whole map consists of an enemy type that has a weapon that can deal effective damage against it that weapon now has the power to break the map. Here it’s the Beast Killer. By having a map where every unit is weak to the Beast Killer the map gives the player an easy “out” to beating it.
2. The Illusion Gimmick: Another massive problem with this map comes in the form of the illusion gimmick. For some weird reason the kitsune gain the ability to avoid being attacked at random times in the map. This gimmick has no strategic value whatsoever and serves no other purpose than to drag out the pacing of the map. It discourages Player Phase action and there’s nothing the player can do about said gimmick.
3. The Kitsune Stats: Another problem with this map is that the kitsune are at that awkward point where they’re strong enough to curbstomp the player’s weaker units but not strong enough to threaten the player’s best units. This incentivizes low-manning, which is contradictory to what the Fates philosophy is supposed to be. To go along with this comes from the fact that every kitsune on the map has ridiculous avoid which means that the player will have shaky hit rates all chapter long. While the kitsune brutally punish mounted units they don’t do so well at punishing fliers, making this map extra vulnerable to wyvern riders.
So here’s a simple formula for trivializing this map
- General / Wyvern Lord + Beast Killer = Broken map
Number of Conquest Bosses With Ridiculous Avoid: 4 + An Army of Furries
Overall Rating: FAIL!

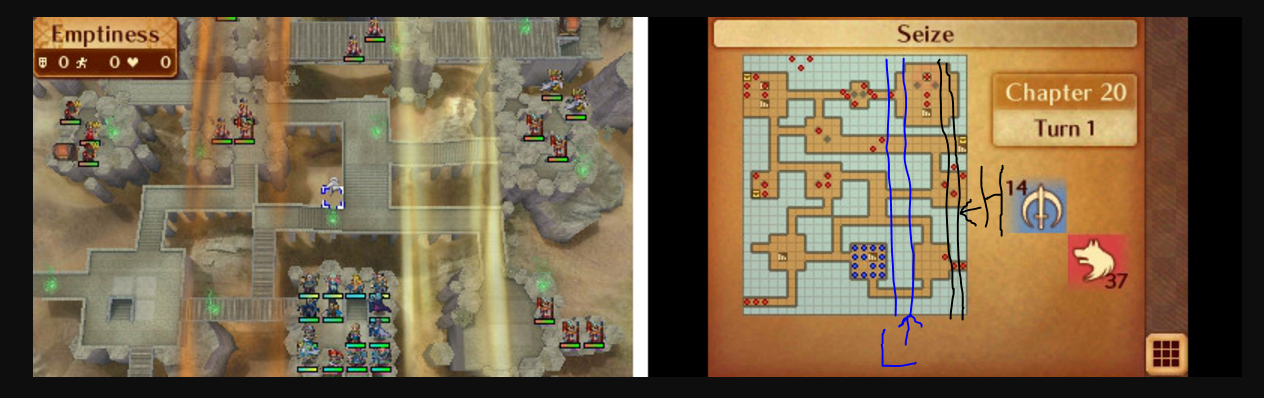
Chapter 20

Another infamous Conquest map: Mr. Fuga’s Wild Ride. This map has a major problem that undermines it: The Wind Gimmick. All the player has to do is park their army in the wind column that will get them closest to the boss (it changes based on which mode is being played. I made a snippet that should give the player a rough idea of what I’m talking about), let said wind column carry their army to the top of the map, bop Mr. Fuga and seize. I’ve tried this strategy on both Hard and Lunatic Mode and it works equally well in both versions. This map can be beaten while the majority of the enemies can be easily ignored. Also, the Dragon Vein is pretty unnecessary. Also is it just me or is Mr. Fuga’s avoid a bit too high in this map?
Number of Conquest Bosses With Ridiculous Avoid: 5 + An Army of Furries
Overall Rating: FAIL!
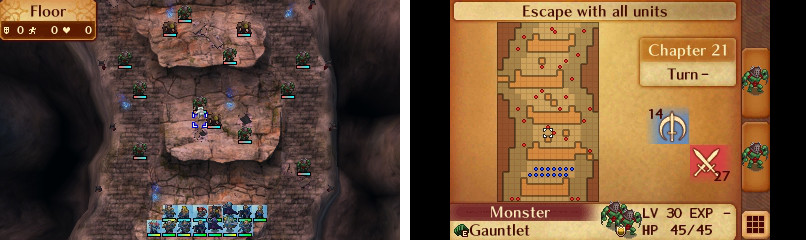
Chapter 21
“Pair Corrin with Camilla. Fly up for three turns. End.” (Quote Source: https://www.reddit.com/r/fireemblem/comments/68iuaj/fates_map_discussion_thread_53_conquest_chapter_21/)
Yeah, when flying in a straight freaking line is an efficient way to deal with a map you know you dun goofed.
Overall Rating: FAIL!
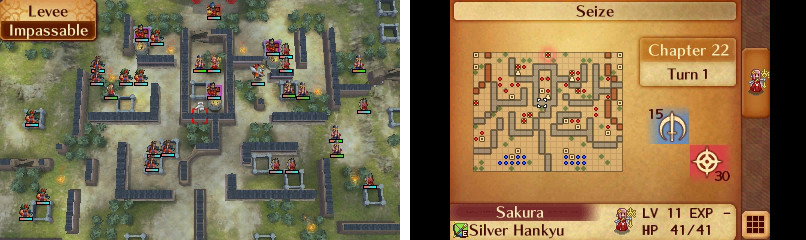
Chapter 22
Alright an actually well designed map in this part of Conquest! I didn’t know those existed. This map gives the player two methods of meaningful approach. This is undermined by the player’s ability to pair everyone up and go one route, but the player still has to pick a route, which counts for something. The map does a very good job at implementing its turtle disincentives providing multiple sets of powerful enemy reinforcements that succeed at pressuring the player to play faster. FE Wiki did a great job breaking this down.
This map also throws debuff ballista at the player and even has Sakura using status staves. These are effective at requiring the player to think carefully about their positioning. Hana and Yukimura have ridiculous avoid, which is a negative. Hana even gets Rend Heaven on Lunatic Mode and a very high chance of activating it too (during my run she activated Rend Heaven every time I fought her. It felt so good for Xander to Luna crit her face off) which makes fighting her even more RNG dependent.
Overall Rating: Pretty Good
Chapter 23
The map that spawned so many memes. What is up with our current fascination with walls? Ahem, anyway, Chapter 23 is one of those maps that looks impressive until you realize that it has a few massive flaws that can severely undermine it.
- Flier-Skip / Para Drop: The bottom portion of Chapter 23 contains a chasm between the wall and the player’s starting position. All the player has to do is Pair-Up their fliers with other units in their army, fly north toward the ballista and “drop” the Pair-Up partners on the other side.

You’d think that the ballista would punish this approach but since ballista don’t kill there’s significantly less harm in this approach. Sure the map still has snipers, but they aren’t present for the part of the map where a flier can paradrop other units. This approach also lets the player ignore a good chunk of enemies to fight without it having any impact on the player’s ability to complete the map. See the green part of the picture below. That represents all the enemies you can ignore and still beat the map in.

2. Severe Lack of A Turtle Disincentive: Another massive flaw in Chapter 23’s design is that it is so easy to fight a few enemies on top of the staircase, go back down the stairs, heal and repeat the entire process. Since the enemies never go down the stairs the player is completely free to play at whatever slow pace they want and this map will not penalize them for that. The end result is that this map becomes easier to cheese without much effort or thought on the part of the player.
The only other problem with this map is that the Lunatic version continues its tradition of randomly giving powerful enemies Rend Heaven (in this case Takumi). This feels like a cheap way to make said enemies stronger because Rend Heaven is an RNG centric skill meaning that the fight against Takumi is RNG reliant. To be fair he already had Vengeance, but then again my issues with Takumi having Vengeance are pretty much the same ones as giving him Rend Heaven.
Overall Rating: FAIL!
Wrap-Up Thoughts: This section of Conquest isn’t just bad, it’s legendary in how bad it is. This is the part of the game where the gimmicks come out in full force and it seriously makes playing Conquest a pain in the butt. These gimmicks do not add to the strategy, in fact they make the game less strategic, not more. What’s worse is that most of them have incredibly easy ways to get trivialized which makes their design even sillier by comparison. Maps like these are a reminder of why I do not Conquest one little bit.
And this is supposed to be the path that makes up for it's shit storytelling with good gameplay too, that's the REALLY sad part.
ReplyDeleteShame, even I was able to have fun with some of these.
Hey wait a minute, Furry Genocide?
ReplyDeleteI thought Corrin had the uncanny ability to order his entire army to not kill a single enemy soldier, did he forget?
I guess furry lives don't matter?
DeleteHe throws out his no kill policy (that he only uses to virtue signal to his siblings) arbitrarily and then mopes about it afterward, and the story still treats him as the paragon of goodness.
ReplyDeleteWorst Lord.