Tuesday, August 15, 2017

Thracia 776 Map Design Review: Chapters 6 - 11

Chapter 6

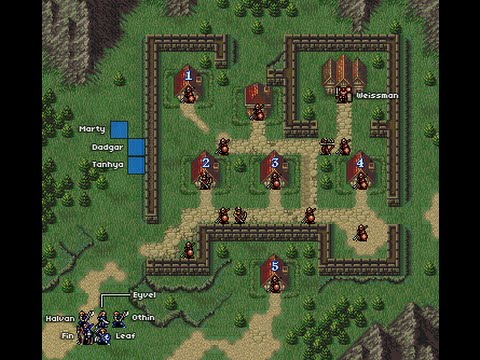
Now this is an escape chapter! Chapter 6 gives you two routes to escape from. It gives you the route to the far right and the route by the doors. The map is augmented by Karin’s ability to rescue someone and fly over the walls. If you rescued the NPCs in Chapter 4x then this map is the payoff for that. The houses all provide wonderful goodies for the player that make visiting them worth it. Visiting the houses will come with a price though. It not only slows the player down, but it also means that the enemy army has more time to catch up to the player. This provides the player with a cost-benefit analysis that everyone who’s played Thracia will have surely had to figure out. Enemy reinforcements show up behind the player so if you take too long you will suffer the consequences. On Turn 15 Galzus will show up and will wreck you if you’re foolish enough to get in his way. In short, this map has everything a great map should have.


Overall Rating: Excellent
_______________________________________


Chapter 7

           This map provides two routes to approach it, however the left route has so many enemies that you’ll probably avoid it and head down the center. The enemy unit density will most likely consist of only Shiva’s group and the reinforcements that show up behind the player. Speaking of that there’s a little trick where you can put one of your units in a certain spot (it’s the spot that the WoD map says is when Eisenhow is supposed to show up) and you can limit the number of enemy reinforcements that come at you. Instead of having 3 cavaliers charge at you it’ll be just one.


                   Keep in mind that this doesn’t prevent the other enemy reinforcements from showing up like the mages and bishop that are supposed to appear on turns 6, 7, 11 & 12 or the soldiers and armor knights on turns 8 - 12. On Turn 13 the boss shows up. So basically the map still has turtle disincentives. In the midst of the swordmaster group the player has to deal with is a recruitable unit named Shiva. In order to recruit Shiva you have to talk to him with Safy who is near the bottom of the map. This is trickier than it sounds since you have to avoid killing Shiva while also managing to get Safy to where he’s at. It’s a good kind of tricky that forces the player to actually think and since Shiva is a worthwhile unit all the effort put into recruiting him will pay off.


Overall Rating: Pretty Good


________________________________________


Chapter 8


This is a really simple map. It has three things going for it:


  1. Marty. Marty McFly is back and you have to re-recruit him. It’s not a huge deal but it at least adds something to the map


  1. The thieves and hunters coming down the mountain side threatening the houses


  1. The gaiden chapter objective. In order to get to the next gaiden chapter you have to capture the boss without releasing him before he becomes a Wyvern Rider on Turn 16. This is easier said than done and it succeeds at making the map a little more challenging.


So yeah, it’s a small and simple chapter, but it succeeds at what it wants to accomplish.


Overall Rating: Decent
Chapter 8x


Here lies an underrated map. It has two routes at the beginning of the chapter that lead toward the boss and the player has to hurry up and save Dagdar and Tanya. Because of the fact that Dagdar can only cover one spot Tanya isn’t completely safe meaning that the player will have to play faster in order to save her. There’s also a thief who tries to get the treasures in the map too which further incentivizes the player to play faster. The treasures are worth getting which means that the effort taken to get them pays off. Gomez, the boss of the chapter, is really strong which adds an extra element of challenge to the map. My only nitpick is that the holy water treasure is placed weird, but it’s really not that big of a deal.

Overall Rating: Excellent

___________________________________________________


Chapter 9


This map is pretty interesting for an escape chapter. There’s a pretty direct route to the escape tile, but there are forest and mountain tiles which prevent make said route more difficult to travel. Then there’s the southern route toward the bishop, his armor knights and the wyverns. You’d think that nobody would ever choose this route but there are legitimate incentives to go down there. For one thing the bishop has a physic staff, a meteor and wind tome. Those are all some sweet goodies to obtain should the bishop happen to get captured. There’s a Stamina bag in the house by the bishop, which is an awesome item. The shop next to the house has purchasable stamina bags, which are expensive, but worth it.


                    The army in the south acts as a turtle disincentive. They will be traveling north toward Selphina’s group. If the player doesn’t arrive in time Selphina’s group will be overrun.

Overall Rating: Excellent

_________________________________________


Chapter 10


 Welcome to “Ballista Land”, the greatest place to satisfy your urge to shoot something down with a ballista. It’s terrifying for everyone else, but hey that’s the point. “Ballista Land” offers differing choices in the routes one can take to approach the map. You can move north of the mountain to get the rescue staff. The northern route lets the player avoid most enemies, except for the ballista and the Bolting bishop. The middle route involves the most enemies. You have to destroy a large section of armor knights while being inside the range of potentially four different ballista. Then there’s the bottom route where there’s a village that gives the player a ward staff. It’s a bit difficult to get there due to the terrain and the fact that there’s a broken bridge that needs to be repaired. The payoff though is that this route has the least ballista that the player would have to deal with.


  Both villages are threatened by thieves so the player will have to play faster in order to get to them. Both thieves have rapiers and stamina drinks so capturing them is worth it. The terrain and ballista make positioning incredibly important which is always a good thing for a strategy game.


Overall Rating: Excellent
_______________________________________


Chapter 11


                    I’ve never been the biggest fan of this map. There’s only one route to take and it’s through a narrow hallway. There’s a gaiden chapter and it’s requirement is that the player beat in less than 30 turns which is way too lenient. Heck you could easily beat this chapter in less than 20 turns.


                           Then there’s the ballista, which in my opinion negatively impact the map. If you don’t see the ballista coming they can feel like a cheap shot that came out of the blue. If you do see them coming they can act as a turtle incentive since you can take your sweet time preparing for them by killing off the armor knights and getting your army into place to prepare for them. Once they’re there they do count as a turtle disincentive since you’re going to want to get as far away from them as possible.


The torch staff you get as the treasure off to the side is worth it since the gaiden chapter is a fog of war map, but it’s a bit off to the side and the player has to go out of their way to get it. The boss of this map flees the next turn after you hit him, which is a bit of a disappointment.


Overall Rating: Below Average
______________________________________


               Final Thoughts: From a map design perspective this is quite arguably the best section of the game. This section gives the player great map after great map. The escape chapters are wonderful and almost all of the chapters reviewed in this post are free of bs.


Thracia’s Map Rating Score So Far:
Excellent - 5
Pretty Good - 4
Decent -  3
Meh - 1
Below Average - 1
Fail - 0

Saturday, August 5, 2017

Thracia 776 Map Design Review: Chapters 1 - 5

Chapter 1

       
     And here we have an example of a well designed first chapter. It avoids the pitfall that some first chapters run into: treating the player like an idiot. These types of first chapters usually have 3 enemies or less and are pretty small. Thracia’s Chapter 1 avoids all of these. Instead it has roughly eleven soldiers and a few archers. It also has houses that can give the player neat stuff (like the Pugi and Brave Axes), although the game doesn’t really tell the player who needs to visit said houses.


                       Having enemy mooks use lances is also an interesting departure given how most first chapters tend to give enemy mooks axes so that the lord can gain easy experience. You also get to start out with an actual army instead of starting with 1 or 2 characters. This leads to more interesting strategies and means that the chapter works better in multiple playthroughs. The boss in this chapter is harder than the bosses in most first chapters due to the really high defense bonuses given by thrones. He’s not too difficult though, but he’s nowhere near as easy as other first bosses either.


Overall Rating: Pretty Good
________________________________________


Chapter 2

  Another quality map. Chapter 2 has a gaiden requirement: Beat the chapter with all the villages intact. This works as an anti-turtle measure because one house will for sure be threatened by the pirates while the house Ronan visits could be under threat if the player doesn’t play fast enough.  Enemy reinforcements come at the side of the map and they appear early enough to be threatening to the player. Since the player is going to be moving off to the right that means that there are two methods of approaching the boss at the end of the chapter which fulfills the “multiple routes” requirement for good map design.


    The boss has fairly high avoid, especially for a boss that only appears in Chapter 2. The only problems I have with the chapter is that there are no enemies on the left side of the map and that Ronan is not a worthwhile unit to recruit. The only reason you’re going to be visiting the house is for the gaiden chapter requirement, not for him.


Overall Rating: Pretty Good
_____________________________________


Chapter 2x

               Not a fan of this one. Chapter 2x is hurt by fog of war, which prevents the player from seeing enemies coming. This hurts the map because it does a good job at disincentivizing turtle disincentives with enemy reinforcements. Enemies appear in forts that are either behind the appear or below them which is a good thing as it helps to punish turtling. One problem with the map is that the bottom lefthand corner is pretty easy to ignore. You could say that the extra torches count as an incentive but the player has to go pretty far out of their way to get them. For all intents and purposes there’s only one method of approaching the chapter (via the bridges) which means that the map has to get docked points for that. It’s an interesting twist that you have to capture the boss though in order to recruit him. I like that.


Overall Rating: Meh
_____________________________________


    Chapter 3

                    This map is an indoor-outdoor hybrid chapter (although that only affects one of your units, but hey credit should be given where credit is due). The map has 3 doors that you can open to approach although realistically you’re probably only going to open the middle one due to how convenient it is. However, there are still two methods of approaching the final boss.


                                 You’re also given an interesting side objective where you have to bring the children NPCs to the houses at the bottom right hand corner of the map. Half of the houses will immediately reward you for bringing their kids back. The rewards in this case are a shield ring and a Baldo scroll, both of which are excellent rewards which makes rescuing the children worth it. The other half don’t immediately reward you though. The reward for bringing back Corpul doesn’t come until Chapter 7, but you get a freaking Warp staff so it’s worth it. The other reward comes in the form of a recruitable Armor Knight which is...debatably worth it. Once again the game doesn’t tell you which NPC to bring to which house which can be a little annoying.


If you spend too much time recruiting the children enemies will spawn at the aforementioned red tiles. If you take really long then enemies will spawn near the boss. I think the map would have benefitted from enemy reinforcements spawning earlier as that would have put more pressure on the player. I do think it’s cool though that the enemy bishop will unlock the door and unlock the treasures. This ultimately results in him getting the Meteor tome, which will make the player’s life miserable. Although, you could argue that ballistic tomes force the player to play faster since nobody wants to deal with that crap.


                                       Overall Rating: Pretty Good
________________________________________

            Chapter 4
                          Ah the infamous Chapter 4. This map begins with Leif, Karin, Rifis and Fergus in prison without weapons or stuff. Brighton, Lara and Makua (what is a Makua?) appear on the right and they’re the ones who have to bust the player out. Enemy density starts out incredibly small, but the chapter’s ingenious use of reinforcements quickly changes that. The near endless supply of enemy reinforcements puts an immense amount of pressure on the player. If the player plays too slow they will get overwhelmed.


                      The map has two really interesting side objectives that spice the chapter up. The first are the NPCs. In order to get the gaiden chapter they all have to escape. Keep in mind that enemies will try to capture them, and can block off certain passages which makes accomplishing this objective difficult. The second objective comes from Leif and Rifis’s stuff being put into treasure chests. Obviously these treasures are important, but at the same time if you have too many treasures you’ll end up spending way more time getting them which means that enemies will have more time to gain reinforcements and put pressure on the player. This also affects how the player will play Chapter 3 and who they give stuff to because if you need something to stay with you during the Manster Escape chapters then you’ll need to give it to Leif and Rifis.


  Then there’s the top portion of the map. It’s a tight squeeze full of enemies. It also has a recruitable character (Dalshien) that makes things tricky. If you want to recruit said character you’ll have to avoid killing him while dealing with the other armor knights that will slow you down. Meanwhile enemies will continue to pour in. If the player doesn’t play smart they will get boxed in from 2 different directions. There’s also an escape tile. If the player doesn’t want any character to get left behind then they have to have that character escape which has some tricky implications as to when you want your character to leave while still leaving other characters behind to fend off enemies.


          P.S. This map gave us The Green Brigand. That should make it awesome by default. Also, let us all take a moment of silence for the Green Brigand.


  Overall Rating: Excellent
__________________________________________


          Chapter 4x
                       Chapter 4x begins with the enemies being next to the player’s units, which forces combat to occur. The enemy formation at the start is interesting since you have a combination of Armor Knights and mages, both of whom can deal extensive damage to individual units if the player is not careful. Once again this map has NPCs that need to escape. Except the difference here is that the player’s reward does not come in until later in Chapter 6. However, I am docking the map points for not telling the player since it’s not obvious what the benefit here is.


                               Once the player has beaten this part of the map they are treated to recruiting Asvel, who is a fantastic unit. There is a room off to the left filled with neat treasure like the Brave Sword and the Life Ring. This also provides an extra way to approach the room that comes between the player and the escape tile. Last, but not least, there are enemy units that approach the player from behind in case the player plays too slowly. Once again I wish that they showed up a little bit sooner since the player will most likely be far away from them, but at least they’re there. One last note is that this is another fog of war chapter. It doesn’t hurt the map too much here though since the map is simply designed.


                                          Overall Rating: Decent
_____________________________________


         Chapter 5

                               This map has an interesting turtle disincentive: Nanna and Eyvel. Both of these characters are in danger since the game will throw difficult enemies at them. You’ll be forced to head to the corridor on the right just to avoid having Nanna get wrecked. Bytheway, Nanna gets reduced movement since she’s a dismounted troubadour in an indoor map. While Eyvel will eventually be able to beat whatever is thrown at her she’ll eventually have to face off against Mareeta who she will not fight back against. That will cause problems because Mareeta is a recruitable character so if the player chooses to kill her off they deprive themselves of a swordmaster with overkill offense. On the other hand, if the player doesn’t do anything, and just lets Eyvel sit there, the end result will be death for Eyvel. Plus you have to open the door to Eyvel and Mareeta in order to escape the chapter since there’s no escape tile before then. However, this only applies to the beginning portion of the map and no longer becomes an issue once Nanna is recruited over to the player’s side.


    Fortunately there’s a bishop with the Meteor tome that the player wouldn’t want to deal with so you could argue that that disincentivizes turtling. That and since you can capture him and claim that Meteor tome for yourself so that’s a thing. Enemy units are set up in groups that can threaten the player. For example, there’s the boss and his archers that can kill a unit that’s in the wrong position. There’s also a bishop with Meteor set up behind an Armor Knight and Soldiers. Last but not least there’s a whole group of mages down at the bottom as well. I am going to dock the map points though for having a random treasure that’s super out of the way. The map also fails to meet the “Multiple Approaches” requirement too.


Overall Rating: Decent
_______________________________________

Thoughts So Far: Thracia 776 starts with a bang. The maps pull no punches and do a pretty good job at requiring strategy out of the player. Turtling gets punished and the player is incentivized for going in different directions. The use of side objectives are also clever in these maps and require a great deal of thinking. This might possibly be the best collection of earlygame maps in the Fire Emblem franchise.  

Map Rating Criteria

  1. Multiple Approaches: Are there 2 or more routes the player can take toward reaching a boss? Are they meaningful? Is one route significantly better than the other ones presented?


  1. Turtle Disincentives: How does the map punish turtling? If you don’t know what the definition of turtling is here’s the Wikipedia article. Some maps will instead hand the player a reward for going faster instead, like giving them more money or a gaiden chapter. This counts for fulfilling this requirement.


  1. Side Objectives: NPCs, villages to rescue, etc. This isn’t something that a chapter has to have but it does count as brownie points when certain maps do this well.


                         Another thing I’ll be looking for will be things like super easy ways to trivialize a map. Examples of this will be like having a paired up wyvern fly in a straight line and thus beat a map in a few turns. Warp skipping doesn’t count because warp can trivialize almost any map. Being trivialized by an infinite range warp staff says less about the map and more about the warp.


I should also point out that some maps don’t necessarily have to have all these things. Exceptions to these rules exist, but I’ll make sure to explain why whenever that map comes around. The first maps of the game will generally be rated more leniently because none of them fulfill important requirements. Instead, they have a different criteria that I’m looking for.


                           Here is the rating system I’ve come up with:


  • Excellent: The highest map rating. Goes toward maps that do the positive things well.


  • Pretty Good: A great map that has a couple of things that prevent it from getting a pass.


  • Decent: This rating is for maps that have more positives than negatives, but have more noticeable negatives.


  • Meh: A mediocre map. Not terrible per se, but also not great either.


  • Below Average: A bad map with a couple of redeeming qualities that prevent from being utter crap.


  • Fail: The lowest map rating. This is reserved for maps that either don’t do anything well or are really easy to undermine.


                         At the end of a game’s map rating I count up every single map that gets a “Decent” rating or higher (Pretty Good and Pass) and then divide that by the number of total maps in the game. That becomes the game’s rating on how good their maps are. I should also point out that if a game has multiple routes (like Thracia 776 or Binding Blade for example) then all maps from all route will be taken into account. I hope you enjoy the map ratings.